
Sunflower embroidery patterns
Thirty two sunflower transfers, free and actual size, every sheet with a numbered stitch key. Pick by head shape, arrangement, foliage, linework, stitch or size.
32 free patterns ·
Drawn and checked by  Ivy Skein
How do you embroider a sunflower centre so it looks like seeds?
Give the disc a texture instead of a flat fill. Work a crossed lattice of long threads and couch each crossing down, or pack the circle with French knots, dense in the middle and opening towards the rim. Both read as seeds from arm's length, and both appear here as printed guides.
The easiest pattern on this page is Tiny Pocket Sunflower Embroidery Pattern. Learn its stitches step by step further down.
By head shape
Five head constructions rather than one head resized: the classic single ring of thirteen rays, a double row whose shorter back petals show between the front ones, a head tilted three quarters towards you with its disc foreshortened to an oval, a ripe seed head nodding on a bent stem, and the closed bud still wrapped in its bracts.

The head everyone means by sunflower: thirteen sharp rays in a single ring round a disc that takes up half the width of the flower, with an inner floret ring and a crossed lattice standing in for the seed spirals.
Stitch key
1 Chain stitch · SZ21 Sunflower · Ray petals work each outline anticlockwise, starting at the dot on the map, each loop holding the last 2 Back stitch · SZ34 Chocolate · Disc outline work the outline clockwise, starting at the dot on the map 3 Back stitch · SZ35 Toffee · Inner floret ring work the outline clockwise, starting at the dot on the map 4 Couching · SZ38 Mustard · Seed lattice lay the long threads first, then tie them down with tiny crossesYou need
2 strands · embroidery needle size 7 · 13 cm hoop · SZ21 Sunflower 3.1 m · SZ34 Chocolate 50 cm · SZ35 Toffee 40 cm · SZ38 Mustard 70 cmWork order
- Ray petals (1)
- Disc outline (2)
- Inner floret ring (3)
- Seed lattice (4)

Two rows of rays instead of one: the back row is drawn shorter and offset half a step, so its tips show in the gaps between the front petals exactly the way layered petals overlap on a real head.
Stitch key
1 Stem stitch · SZ38 Mustard · Back row of rays work each outline anticlockwise, starting at the dot on the map, thread always on the same side 2 Chain stitch · SZ21 Sunflower · Front row of rays work each outline anticlockwise, starting at the dot on the map, each loop holding the last 3 Back stitch · SZ34 Chocolate · Disc rim work the outline clockwise, starting at the dot on the map 4 French knot · SZ35 Toffee · Seed knots in the disc work the knots last, on the printed spotsYou need
2 strands · embroidery needle size 7 · any hoop or frame that clears the drawing · SZ38 Mustard 1.7 m · SZ21 Sunflower 3.1 m · SZ34 Chocolate 50 cm · SZ35 Toffee 1.1 mWork order
- Back row of rays (1)
- Front row of rays (2)
- Disc rim (3)
- Seed knots in the disc (4)

A head leaning towards you: the disc foreshortens into an oval, the rays shorten at the sides and three green bracts show under the lower rim, which is what a tilt actually exposes.
Stitch key
1 Chain stitch · SZ21 Sunflower · Foreshortened rays work each outline anticlockwise, starting at the dot on the map, each loop holding the last 2 Back stitch · SZ34 Chocolate · Oval disc work the outline clockwise, starting at the dot on the map 3 Back stitch · SZ35 Toffee · Inner disc ring work the outline clockwise, starting at the dot on the map 4 Back stitch · SZ25 Pine · Bracts under the rim work each outline anticlockwise, starting at the dot on the mapYou need
2 strands · embroidery needle size 7 · any hoop or frame that clears the drawing · SZ21 Sunflower 2.9 m · SZ34 Chocolate 50 cm · SZ35 Toffee 40 cm · SZ25 Pine 60 cmWork order
- Foreshortened rays (1)
- Oval disc (2)
- Inner disc ring (3)
- Bracts under the rim (4)

September rather than July: the ripe head hangs from a bent stem, the spent rays droop as a fringe round the disc, the bracts show where the stem arrives and four loose seeds fall below it.
Stitch key
1 Stem stitch · SZ23 Olive · Bent stem work the line right to left, thread always on the same side 2 Back stitch · SZ34 Chocolate · Hanging seed disc work the outline clockwise, starting at the dot on the map 3 Back stitch · SZ38 Mustard · Fringe of spent rays work each outline anticlockwise, starting at the dot on the map 4 Back stitch · SZ25 Pine · Bracts at the stem work each outline anticlockwise, starting at the dot on the map 5 French knot · SZ34 Chocolate · Falling seeds work the knots last, on the printed spots 6 Back stitch · SZ24 Leaf Green · Leaf on the stem work the outline anticlockwise, starting at the dot on the mapYou need
2 strands · embroidery needle size 7 · any hoop or frame that clears the drawing · SZ23 Olive 70 cm · SZ34 Chocolate 1.7 m · SZ38 Mustard 1.0 m · SZ25 Pine 50 cm · SZ24 Leaf Green 40 cmWork order
- Bent stem (1)
- Hanging seed disc (2)
- Fringe of spent rays (3)
- Bracts at the stem (4)
- Leaf on the stem (6)
- Falling seeds (5)

The head before it opens: an oval body wrapped in five pointed bracts, three first ray tips escaping at the top, and a straight young stem with one small heart leaf. A different construction, not a small bloom.
Stitch key
1 Back stitch · SZ22 Butter · Bud body work the outline clockwise, starting at the dot on the map 2 Back stitch · SZ25 Pine · Clasping bracts work each outline anticlockwise, starting at the dot on the map 3 Back stitch · SZ21 Sunflower · First ray tips work each outline anticlockwise, starting at the dot on the map 4 Stem stitch · SZ23 Olive · Young stem work the line left to right, thread always on the same side 5 Back stitch · SZ24 Leaf Green · Small heart leaf work the outline anticlockwise, starting at the dot on the mapYou need
2 strands · embroidery needle size 7 · any hoop or frame that clears the drawing · SZ22 Butter 40 cm · SZ25 Pine 80 cm · SZ21 Sunflower 30 cm · SZ23 Olive 50 cm · SZ24 Leaf Green 40 cmWork order
- Bud body (1)
- Clasping bracts (2)
- First ray tips (3)
- Young stem (4)
- Small heart leaf (5)
By arrangement
Where the flower goes decides its shape before the drawing does: one bloom on a tall thick stem for a placket, three stems gathered under a ribbon bow, five heads circling an empty wreath middle left for a name, an L that hugs a napkin corner, and a border whose repeat alternates heads above and below the line so a hem reads as growth.

One bloom on a stem tall enough for a placket, a bookmark or a door hanger. The stem is a taper with real thickness because a sunflower stalk drawn as one stroke reads as a lollipop, and two heart leaves break its length.
Stitch key
1 Chain stitch · SZ21 Sunflower · Rays of the single bloom work each outline anticlockwise, starting at the dot on the map, each loop holding the last 2 Back stitch · SZ34 Chocolate · Seed disc work the outline clockwise, starting at the dot on the map 3 Stem stitch · SZ23 Olive · Thick stem work the line left to right, thread always on the same side 4 Back stitch · SZ24 Leaf Green · Heart leaves work each outline anticlockwise, starting at the dot on the map 5 Split stitch · SZ25 Pine · Leaf veins work each line left to right, one at a timeYou need
2 strands · embroidery needle size 7 · any hoop or frame that clears the drawing · SZ21 Sunflower 1.9 m · SZ34 Chocolate 40 cm · SZ23 Olive 80 cm · SZ24 Leaf Green 60 cm · SZ25 Pine 40 cmWork order
- Rays of the single bloom (1)
- Seed disc (2)
- Thick stem (3)
- Heart leaves (4)
- Leaf veins (5)

Three stems gathered in one hand: a big bloom low on the left, a smaller one high on the right and a bud between them, their stems crossing at a pink ribbon bow that is the one satin filled shape on the sheet.
Stitch key
1 Chain stitch · SZ21 Sunflower · Bloom rays work each outline anticlockwise, starting at the dot on the map, each loop holding the last 2 Back stitch · SZ34 Chocolate · Bloom discs work each outline clockwise, starting at the dot on the map 3 Back stitch · SZ25 Pine · Bud and its bracts work each outline clockwise, starting at the dot on the map 4 Stem stitch · SZ23 Olive · Gathered stems work each line left to right, one at a time, thread always on the same side 5 Back stitch · SZ24 Leaf Green · Bouquet leaves work each outline anticlockwise, starting at the dot on the map 6 Satin stitch · SZ11 Bubblegum · Ribbon bow fill each shape with parallel strokes laid top to bottomYou need
2 strands · embroidery needle size 7 · any hoop or frame that clears the drawing · SZ21 Sunflower 3.1 m · SZ34 Chocolate 60 cm · SZ25 Pine 70 cm · SZ23 Olive 1.6 m · SZ24 Leaf Green 50 cm · SZ11 Bubblegum 1.5 mWork order
- Bloom rays (1)
- Bloom discs (2)
- Bud and its bracts (3)
- Gathered stems (4)
- Bouquet leaves (5)
- Ribbon bow (6)

Five small heads spaced round a ring with heart leaf pairs between them and gold knots dotted along the stem line. The middle stays empty on purpose: it is the space a name or a date gets stitched into.
Stitch key
1 Chain stitch · SZ21 Sunflower · Rays round the ring work each outline anticlockwise, starting at the dot on the map, each loop holding the last 2 Back stitch · SZ34 Chocolate · Five small discs work each outline clockwise, starting at the dot on the map 3 Back stitch · SZ24 Leaf Green · Leaf pairs between work each outline anticlockwise, starting at the dot on the map 4 Stem stitch · SZ23 Olive · Stem ring work each line top to bottom, one at a time, thread always on the same side 5 French knot · SZ38 Mustard · Gold filler knots work the knots last, on the printed spotsYou need
2 strands · embroidery needle size 7 · 15 cm hoop · SZ21 Sunflower 4.7 m · SZ34 Chocolate 80 cm · SZ24 Leaf Green 1.3 m · SZ23 Olive 1.0 m · SZ38 Mustard 70 cmWork order
- Rays round the ring (1)
- Five small discs (2)
- Leaf pairs between (3)
- Stem ring (4)
- Gold filler knots (5)

An L for a napkin, a pillowcase or a tablecloth corner: the stem line turns through ninety degrees with the one open bloom sitting at the elbow, a bud running out along one arm and small leaves down the other.
Stitch key
1 Stem stitch · SZ23 Olive · Stem line through the corner work the line down towards the right, thread always on the same side 2 Chain stitch · SZ21 Sunflower · Rays at the elbow work each outline anticlockwise, starting at the dot on the map, each loop holding the last 3 Back stitch · SZ34 Chocolate · Disc at the elbow work the outline clockwise, starting at the dot on the map 4 Back stitch · SZ25 Pine · Trailing bud work each outline clockwise, starting at the dot on the map 5 Lazy daisy · SZ24 Leaf Green · Small leaves along the arms work each petal loop from its base out to the tipYou need
2 strands · embroidery needle size 7 · any hoop or frame that clears the drawing · SZ23 Olive 70 cm · SZ21 Sunflower 1.4 m · SZ34 Chocolate 40 cm · SZ25 Pine 60 cm · SZ24 Leaf Green 90 cmWork order
- Stem line through the corner (1)
- Rays at the elbow (2)
- Disc at the elbow (3)
- Trailing bud (4)
- Small leaves along the arms (5)

A border whose heads alternate: one above the waving stem line, the next below it, so the band reads as growth rather than as a stamp. Trace the one unit shown three times and carry it as far as the hem runs.
Stitch key
1 Stem stitch · SZ23 Olive · Waving stem line work the line left to right, thread always on the same side 2 Chain stitch · SZ21 Sunflower · Alternating rays work each outline anticlockwise, starting at the dot on the map, each loop holding the last 3 Back stitch · SZ34 Chocolate · Alternating discs work each outline clockwise, starting at the dot on the map 4 Lazy daisy · SZ24 Leaf Green · Leaves along the wave work each petal loop from its base out to the tip 5 French knot · SZ38 Mustard · Knots at the joins work the knots last, on the printed spotsYou need
2 strands · embroidery needle size 7 · any hoop or frame that clears the drawing · SZ23 Olive 80 cm · SZ21 Sunflower 1.9 m · SZ34 Chocolate 50 cm · SZ24 Leaf Green 70 cm · SZ38 Mustard 40 cmWork order
- Waving stem line (1)
- Alternating rays (2)
- Alternating discs (3)
- Leaves along the wave (4)
- Knots at the joins (5)
By leaves and stems
The green half of the plant, which most sunflower patterns leave out: a study of the big toothed heart leaves on their stalks, two cut stems that cross and lean apart, a head backed by a ruff of six leaves, a long S of stem with a leaf on the outside of each bend, and the view from behind, all bracts and stalk and no petals at all.

No flower anywhere: three heart shaped blades on their stalks, one full sized with toothed edges and complete vein work, one smooth, one young and barely notched. Stitch it as a spray or raid it for leaves.
Stitch key
1 Back stitch · SZ24 Leaf Green · Toothed leaf outline work the outline anticlockwise, starting at the dot on the map 2 Split stitch · SZ25 Pine · Midribs and side veins work each line left to right, one at a time 3 Back stitch · SZ39 Fern · Smooth leaf outline work the outline anticlockwise, starting at the dot on the map 4 Back stitch · SZ26 Mint · Young leaf outline work the outline anticlockwise, starting at the dot on the map 5 Stem stitch · SZ23 Olive · Leaf stalks work each line down towards the left, one at a time, thread always on the same sideYou need
2 strands · embroidery needle size 7 · any hoop or frame that clears the drawing · SZ24 Leaf Green 70 cm · SZ25 Pine 80 cm · SZ39 Fern 50 cm · SZ26 Mint 40 cm · SZ23 Olive 30 cmWork order
- Toothed leaf outline (1)
- Midribs and side veins (2)
- Smooth leaf outline (3)
- Young leaf outline (4)
- Leaf stalks (5)

Two stems that cross once and lean apart, the way cut stems actually sit when you lay them down: a bigger head up on the left, a smaller on the right, leaves sprouting at the crossing and two straight stitches binding it.
Stitch key
1 Chain stitch · SZ21 Sunflower · Rays of both blooms work each outline anticlockwise, starting at the dot on the map, each loop holding the last 2 Back stitch · SZ34 Chocolate · Both seed discs work each outline clockwise, starting at the dot on the map 3 Stem stitch · SZ23 Olive · Stems that cross work each line up towards the right, one at a time, thread always on the same side 4 Back stitch · SZ24 Leaf Green · Leaves at the crossing work each outline anticlockwise, starting at the dot on the map 5 Straight stitch · SZ35 Toffee · Binding tie work each line left to right, one at a timeYou need
2 strands · embroidery needle size 7 · any hoop or frame that clears the drawing · SZ21 Sunflower 2.7 m · SZ34 Chocolate 50 cm · SZ23 Olive 1.3 m · SZ24 Leaf Green 50 cm · SZ35 Toffee 30 cmWork order
- Rays of both blooms (1)
- Both seed discs (2)
- Stems that cross (3)
- Leaves at the crossing (4)
- Binding tie (5)

The head wears its own foliage: six heart leaves radiate from behind the bloom so their tips show between and beyond the rays, a green ruff that fills a hoop without a single extra stem.
Stitch key
1 Back stitch · SZ24 Leaf Green · Ring of leaves behind the head work each outline anticlockwise, starting at the dot on the map 2 Chain stitch · SZ21 Sunflower · Rays over the leaves work each outline anticlockwise, starting at the dot on the map, each loop holding the last 3 Back stitch · SZ34 Chocolate · Central disc work the outline clockwise, starting at the dot on the map 4 Couching · SZ38 Mustard · Lattice in the disc lay the long threads first, then tie them down with tiny crossesYou need
2 strands · embroidery needle size 7 · 13 cm hoop · SZ24 Leaf Green 1.1 m · SZ21 Sunflower 2.3 m · SZ34 Chocolate 50 cm · SZ38 Mustard 60 cmWork order
- Ring of leaves behind the head (1)
- Rays over the leaves (2)
- Central disc (3)
- Lattice in the disc (4)

The stem is the subject: a long S that puts one leaf on the outside of each bend, which is where a real stalk grows them, with the bloom closing the top of the curve. Drawn for the tall narrow space beside a zip or a seam.
Stitch key
1 Chain stitch · SZ21 Sunflower · Rays at the stem tip work each outline anticlockwise, starting at the dot on the map, each loop holding the last 2 Back stitch · SZ34 Chocolate · Disc above the curve work the outline clockwise, starting at the dot on the map 3 Stem stitch · SZ23 Olive · S curved stem work the line down towards the right, thread always on the same side 4 Back stitch · SZ24 Leaf Green · Leaves on the outer bends work each outline anticlockwise, starting at the dot on the map 5 Split stitch · SZ25 Pine · Their veins work each line right to left, one at a timeYou need
2 strands · embroidery needle size 7 · any hoop or frame that clears the drawing · SZ21 Sunflower 1.7 m · SZ34 Chocolate 40 cm · SZ23 Olive 90 cm · SZ24 Leaf Green 60 cm · SZ25 Pine 40 cmWork order
- Rays at the stem tip (1)
- Disc above the curve (2)
- S curved stem (3)
- Leaves on the outer bends (4)
- Their veins (5)

The view nobody draws: the back of the head. Two rings of pointed bracts star out from the round stem base, the ray tips just show past the outer ring, and the thick stalk drops straight down from the middle.
Stitch key
1 Back stitch · SZ25 Pine · Outer ring of bracts work each outline anticlockwise, starting at the dot on the map 2 Back stitch · SZ24 Leaf Green · Inner ring of bracts work each outline anticlockwise, starting at the dot on the map 3 Back stitch · SZ21 Sunflower · Ray tips showing past the bracts work each outline anticlockwise, starting at the dot on the map 4 Back stitch · SZ23 Olive · Round stem base work the outline clockwise, starting at the dot on the map 5 Stem stitch · SZ23 Olive · Stalk seen from behind work the line left to right, thread always on the same sideYou need
2 strands · embroidery needle size 7 · any hoop or frame that clears the drawing · SZ25 Pine 1.3 m · SZ24 Leaf Green 1.0 m · SZ21 Sunflower 80 cm · SZ23 Olive 80 cmWork order
- Outer ring of bracts (1)
- Inner ring of bracts (2)
- Ray tips showing past the bracts (3)
- Round stem base (4)
- Stalk seen from behind (5)
By how much linework it carries
The same flower at five levels of drawing: an outline version that stays inside the beginner stitches and is held there by the build, a botanical study with a dissected ray and leaf beside the plant, a minimal eight ray version for sheer fabric, a folk version with alternating petals and cherry red knots, and a geometric one with not a curve anywhere.

Every line is back stitch, stem stitch or split stitch and there is no filling anywhere, which the build enforces rather than promises. One head, one line stem, one leaf: the whole flower in an evening.
Stitch key
1 Back stitch · SZ21 Sunflower · Ray outlines work each outline anticlockwise, starting at the dot on the map 2 Back stitch · SZ34 Chocolate · Disc circle work the outline clockwise, starting at the dot on the map 3 Stem stitch · SZ23 Olive · Stem line work the line top to bottom, thread always on the same side 4 Back stitch · SZ24 Leaf Green · Leaf edge work the outline anticlockwise, starting at the dot on the map 5 Split stitch · SZ25 Pine · Midrib work the line left to rightYou need
2 strands · embroidery needle size 7 · any hoop or frame that clears the drawing · SZ21 Sunflower 1.1 m · SZ34 Chocolate 40 cm · SZ23 Olive 40 cm · SZ24 Leaf Green 40 cm · SZ25 Pine 30 cmWork order
- Ray outlines (1)
- Disc circle (2)
- Stem line (3)
- Leaf edge (4)
- Midrib (5)

The detailed end of the page: a double rayed head over a latticed disc, a toothed leaf with its side veins drawn in, and, plate fashion, one ray petal and one young leaf dissected out beside the plant.
Stitch key
1 Stem stitch · SZ38 Mustard · Shorter back rays work each outline anticlockwise, starting at the dot on the map, thread always on the same side 2 Chain stitch · SZ21 Sunflower · Front rays, one dissected work each outline anticlockwise, starting at the dot on the map, each loop holding the last 3 Back stitch · SZ34 Chocolate · Disc rim and inner ring work each outline clockwise, starting at the dot on the map 4 Couching · SZ35 Toffee · Seed spiral lattice lay the long threads first, then tie them down with tiny crosses 5 Stem stitch · SZ23 Olive · Main stem work the line left to right, thread always on the same side 6 Back stitch · SZ24 Leaf Green · Toothed leaves, one dissected work each outline anticlockwise, starting at the dot on the map 7 Split stitch · SZ25 Pine · Vein work work each line left to right, one at a timeYou need
2 strands · embroidery needle size 7 · any hoop or frame that clears the drawing · SZ38 Mustard 1.5 m · SZ21 Sunflower 3.0 m · SZ34 Chocolate 70 cm · SZ35 Toffee 60 cm · SZ23 Olive 60 cm · SZ24 Leaf Green 60 cm · SZ25 Pine 50 cmWork order
- Shorter back rays (1)
- Front rays, one dissected (2)
- Disc rim and inner ring (3)
- Main stem (5)
- Toothed leaves, one dissected (6)
- Vein work (7)
- Seed spiral lattice (4)

Everything that can come off has come off: eight rays with clear fabric between them, a disc left empty, one stroke of stem and one leaf. What is left is the flower, and it holds on sheer fabric.
Stitch key
1 Back stitch · SZ21 Sunflower · Eight spaced rays work each outline anticlockwise, starting at the dot on the map 2 Back stitch · SZ34 Chocolate · Empty disc work the outline clockwise, starting at the dot on the map 3 Stem stitch · SZ23 Olive · Single line stem work the line top to bottom, thread always on the same side 4 Back stitch · SZ24 Leaf Green · One leaf work the outline anticlockwise, starting at the dot on the mapYou need
2 strands · embroidery needle size 7 · any hoop or frame that clears the drawing · SZ21 Sunflower 80 cm · SZ34 Chocolate 40 cm · SZ23 Olive 40 cm · SZ24 Leaf Green 40 cmWork order
- Eight spaced rays (1)
- Empty disc (2)
- Single line stem (3)
- One leaf (4)

The painted furniture register: pointed rays alternate with round petals, the disc is two plain rings round a circle of cherry red knots, and two stems curl symmetrically below it. Flat, bold and deliberately unnatural.
Stitch key
1 Chain stitch · SZ20 Tangerine · Pointed folk petals work each outline anticlockwise, starting at the dot on the map, each loop holding the last 2 Back stitch · SZ21 Sunflower · Round petals between work each outline clockwise, starting at the dot on the map 3 Back stitch · SZ34 Chocolate · Double disc rings work each outline clockwise, starting at the dot on the map 4 French knot · SZ13 Cherry Red · Red dot ring work the knots last, on the printed spots 5 Stem stitch · SZ25 Pine · Mirrored curling stems work each line top to bottom, one at a time, thread always on the same side 6 Lazy daisy · SZ24 Leaf Green · Folk leaves work each petal loop from its base out to the tipYou need
2 strands · embroidery needle size 7 · any hoop or frame that clears the drawing · SZ20 Tangerine 1.8 m · SZ21 Sunflower 90 cm · SZ34 Chocolate 70 cm · SZ13 Cherry Red 60 cm · SZ25 Pine 50 cm · SZ24 Leaf Green 70 cmWork order
- Pointed folk petals (1)
- Round petals between (2)
- Double disc rings (3)
- Mirrored curling stems (5)
- Folk leaves (6)
- Red dot ring (4)

Not one curve anywhere: twelve triangle rays round a twelve sided disc, straight seed lines crossing inside it, a two line stem and a diamond leaf on each side. Count the runs instead of following a bend.
Stitch key
1 Back stitch · SZ21 Sunflower · Triangle rays work each line left to right, one at a time 2 Back stitch · SZ34 Chocolate · Twelve sided disc work the outline clockwise, starting at the dot on the map 3 Straight stitch · SZ35 Toffee · Straight seed lines work each line down towards the right, one at a time 4 Back stitch · SZ23 Olive · Two line stem work each line top to bottom, one at a time 5 Back stitch · SZ24 Leaf Green · Diamond leaves work each outline anticlockwise, starting at the dot on the mapYou need
2 strands · embroidery needle size 7 · any hoop or frame that clears the drawing · SZ21 Sunflower 1.2 m · SZ34 Chocolate 50 cm · SZ35 Toffee 50 cm · SZ23 Olive 50 cm · SZ24 Leaf Green 50 cmWork order
- Triangle rays (1)
- Twelve sided disc (2)
- Straight seed lines (3)
- Two line stem (4)
- Diamond leaves (5)
By the stitch it teaches
Six sheets whose geometry is made for the named stitch rather than renamed after it: closed rays for satin, a disc packed with marked French knot positions, broad petals banded for long and short shading, a giant disc crossed with laid threads for couching, a version chained from rays to leaves, and a seeded disc that grades from dense to open.

Rays drawn to be FILLED: each one a closed shape narrow enough to satin from edge to edge without a laid foundation, none touching its neighbour, around a disc crossed with a laid lattice. Fill the rays last.
Stitch key
1 Satin stitch · SZ21 Sunflower · Rays filled edge to edge fill each shape with parallel strokes laid side to side 2 Back stitch · SZ34 Chocolate · Disc rim work the outline clockwise, starting at the dot on the map 3 Couching · SZ35 Toffee · Lattice across the seeds lay the long threads first, then tie them down with tiny crossesYou need
2 strands · embroidery needle size 7 · 10 cm hoop · SZ21 Sunflower 8.0 m · SZ34 Chocolate 50 cm · SZ35 Toffee 70 cmWork order
- Disc rim (2)
- Rays filled edge to edge (1)
- Lattice across the seeds (3)

The disc does what a sunflower disc really is, hundreds of florets: the sheet marks every knot position on a close lattice walk, so the texture comes out even instead of crowding the middle. Rays stay simple outlines.
Stitch key
1 Back stitch · SZ21 Sunflower · Ray outlines round the disc work each outline anticlockwise, starting at the dot on the map 2 Back stitch · SZ34 Chocolate · Disc edge work the outline clockwise, starting at the dot on the map 3 French knot · SZ35 Toffee · Disc packed with French knots work the knots last, on the printed spots 4 Stem stitch · SZ23 Olive · Short thick stem work the line left to right, thread always on the same side 5 Back stitch · SZ24 Leaf Green · One heart leaf work the outline anticlockwise, starting at the dot on the mapYou need
2 strands · embroidery needle size 7 · any hoop or frame that clears the drawing · SZ21 Sunflower 1.3 m · SZ34 Chocolate 50 cm · SZ35 Toffee 3.4 m · SZ23 Olive 40 cm · SZ24 Leaf Green 40 cmWork order
- Ray outlines round the disc (1)
- Disc edge (2)
- Short thick stem (4)
- One heart leaf (5)
- Disc packed with French knots (3)

Ten rays instead of thirteen, each broad enough for two bands of long and short stitch, darkest at the disc and palest at the tip. Two rays carry printed direction guides so the shading runs along the petal, not across it.
Stitch key
1 Long and short stitch · SZ20 Tangerine · Broad rays for shading fill each shape with parallel strokes laid side to side 2 Back stitch · SZ34 Chocolate · Rim of the disc work the outline clockwise, starting at the dot on the map 3 French knot · SZ38 Mustard · Knotted centre work the knots last, on the printed spots 4 Straight stitch · SZ37 Terracotta · Printed direction guides work each line top to bottom, one at a timeYou need
2 strands · embroidery needle size 7 · 13 cm hoop · SZ20 Tangerine 10.3 m · SZ34 Chocolate 50 cm · SZ38 Mustard 1.1 m · SZ37 Terracotta 30 cmWork order
- Rim of the disc (2)
- Printed direction guides (4)
- Broad rays for shading (1)
- Knotted centre (3)

The disc takes over: nearly two thirds of the head, crossed by long laid threads you fasten with a tiny stitch at every crossing, which is couching doing the one thing no other stitch does well. The rays shrink to a border.
Stitch key
1 Back stitch · SZ21 Sunflower · Short rays round a giant disc work each outline anticlockwise, starting at the dot on the map 2 Back stitch · SZ34 Chocolate · Giant disc rim work the outline clockwise, starting at the dot on the map 3 Couching · SZ35 Toffee · Laid lattice, couched at the crossings lay the long threads first, then tie them down with tiny crosses 4 Stem stitch · SZ23 Olive · Stem stub work the line left to right, thread always on the same side 5 Back stitch · SZ24 Leaf Green · Leaf at the stem work the outline anticlockwise, starting at the dot on the mapYou need
2 strands · embroidery needle size 7 · any hoop or frame that clears the drawing · SZ21 Sunflower 1.5 m · SZ34 Chocolate 60 cm · SZ35 Toffee 70 cm · SZ23 Olive 40 cm · SZ24 Leaf Green 30 cmWork order
- Short rays round a giant disc (1)
- Giant disc rim (2)
- Stem stub (4)
- Leaf at the stem (5)
- Laid lattice, couched at the crossings (3)

One linked family of stitches: the rays and the stem in chain, the disc filled by a single whipped spiral that starts at the middle and coils to the rim, and the leaves as detached chain loops. Nothing else appears.
Stitch key
1 Chain stitch · SZ21 Sunflower · Rays worked in chain work each outline anticlockwise, starting at the dot on the map, each loop holding the last 2 Whipped back stitch · SZ34 Chocolate · Spiral filling the disc work the line bottom to top, then whip back over it 3 Back stitch · SZ35 Toffee · Rim round the spiral work the outline clockwise, starting at the dot on the map 4 Chain stitch · SZ23 Olive · Stem in chain too work the line top to bottom, each loop holding the last 5 Lazy daisy · SZ24 Leaf Green · Detached chain leaves work each petal loop from its base out to the tipYou need
2 strands · embroidery needle size 7 · any hoop or frame that clears the drawing · SZ21 Sunflower 2.3 m · SZ34 Chocolate 80 cm · SZ35 Toffee 50 cm · SZ23 Olive 40 cm · SZ24 Leaf Green 50 cmWork order
- Rays worked in chain (1)
- Spiral filling the disc (2)
- Rim round the spiral (3)
- Stem in chain too (4)
- Detached chain leaves (5)

Seed stitch used for actual seeds: two printed scatters overlap so the middle of the disc is dense and the rim stays open, the honest way a ripe head grades. Rays in stem stitch, two bracts peeking below.
Stitch key
1 Stem stitch · SZ21 Sunflower · Rays in stem stitch work each outline anticlockwise, starting at the dot on the map, thread always on the same side 2 Back stitch · SZ34 Chocolate · Disc boundary work the outline clockwise, starting at the dot on the map 3 Seed stitch · SZ35 Toffee · Seed stitches, dense to open scatter the little stitches at changing angles 4 Back stitch · SZ25 Pine · Two bracts below work each outline anticlockwise, starting at the dot on the mapYou need
2 strands · embroidery needle size 7 · any hoop or frame that clears the drawing · SZ21 Sunflower 2.1 m · SZ34 Chocolate 60 cm · SZ35 Toffee 1.9 m · SZ25 Pine 40 cmWork order
- Rays in stem stitch (1)
- Disc boundary (2)
- Two bracts below (4)
- Seed stitches, dense to open (3)
By finished size and destination
Six pieces measured before they were drawn: a thirty two millimetre pocket flower, a true mirrored collar pair, a cuff band that stays inside twenty six millimetres of height, one head for a ten centimetre hoop, a two flower composition for a fifteen, and a tote panel over fourteen centimetres across with no detail finer than five millimetres.

Thirty two millimetres: ten rays, a disc, a short stem and two leaves, and nothing smaller than a line one strand can hold. It sits beside a pocket seam and goes from tracing to finished inside an evening.
Stitch key
1 Back stitch · SZ21 Sunflower · Tiny rays work each outline anticlockwise, starting at the dot on the map 2 Back stitch · SZ34 Chocolate · Tiny disc work the outline clockwise, starting at the dot on the map 3 Stem stitch · SZ23 Olive · Short stem work the line top to bottom, thread always on the same side 4 Back stitch · SZ24 Leaf Green · Two tiny leaves work each outline anticlockwise, starting at the dot on the mapYou need
1 strand · embroidery needle size 9 · any hoop or frame that clears the drawing · SZ21 Sunflower 50 cm · SZ34 Chocolate 30 cm · SZ23 Olive 30 cm · SZ24 Leaf Green 40 cmWork order
- Tiny rays (1)
- Tiny disc (2)
- Short stem (3)
- Two tiny leaves (4)

A true mirrored pair printed at collar spacing: each bloom leans inward on a curved stem with one leaf, and every point on the left flower is the exact reflection of the right, so the two collar points match.
Stitch key
1 Chain stitch · SZ21 Sunflower · Rays of the mirrored pair work each outline anticlockwise, starting at the dot on the map, each loop holding the last 2 Back stitch · SZ34 Chocolate · The two discs work each outline clockwise, starting at the dot on the map 3 Stem stitch · SZ23 Olive · Leaning stems work each line down towards the right, one at a time, thread always on the same side 4 Back stitch · SZ24 Leaf Green · Collar point leaves work each outline anticlockwise, starting at the dot on the mapYou need
2 strands · embroidery needle size 7 · any hoop or frame that clears the drawing · SZ21 Sunflower 1.8 m · SZ34 Chocolate 40 cm · SZ23 Olive 40 cm · SZ24 Leaf Green 40 cmWork order
- Rays of the mirrored pair (1)
- The two discs (2)
- Leaning stems (3)
- Collar point leaves (4)

The whole band stays inside twenty six millimetres of height, which is the space between the stitching lines of a standard cuff: three small heads on short stems off a straight rail, a leaf between each pair.
Stitch key
1 Stem stitch · SZ23 Olive · Rail along the seam work each line left to right, one at a time, thread always on the same side 2 Back stitch · SZ21 Sunflower · Small rays work each outline anticlockwise, starting at the dot on the map 3 Back stitch · SZ34 Chocolate · Small discs work each outline clockwise, starting at the dot on the map 4 Back stitch · SZ24 Leaf Green · Leaves between the blooms work each outline anticlockwise, starting at the dot on the mapYou need
2 strands · embroidery needle size 7 · any hoop or frame that clears the drawing · SZ23 Olive 70 cm · SZ21 Sunflower 90 cm · SZ34 Chocolate 40 cm · SZ24 Leaf Green 40 cmWork order
- Rail along the seam (1)
- Small rays (2)
- Small discs (3)
- Leaves between the blooms (4)

Measured for a ten centimetre hoop with fabric left for the ring to grip: one head with crossed seed lines stops well inside the hoop circle, and two small leaves anchor the base. The dashed ring prints as a centring guide.
Stitch key
1 Chain stitch · SZ21 Sunflower · Rays inside the ring work each outline anticlockwise, starting at the dot on the map, each loop holding the last 2 Back stitch · SZ34 Chocolate · Disc centred in the hoop work the outline clockwise, starting at the dot on the map 3 Couching · SZ38 Mustard · Crossed seed lines lay the long threads first, then tie them down with tiny crosses 4 Back stitch · SZ24 Leaf Green · Two leaves at the foot work each outline anticlockwise, starting at the dot on the mapYou need
2 strands · embroidery needle size 7 · 10 cm hoop · SZ21 Sunflower 2.4 m · SZ34 Chocolate 50 cm · SZ38 Mustard 60 cm · SZ24 Leaf Green 50 cmWork order
- Rays inside the ring (1)
- Disc centred in the hoop (2)
- Two leaves at the foot (4)
- Crossed seed lines (3)

A full composition for the common fifteen centimetre hoop: the main bloom sits high on the left over its latticed disc, a bud leans in from the right, their stems part company at the base and four gold knots fill the open corner.
Stitch key
1 Chain stitch · SZ21 Sunflower · Main bloom rays work each outline anticlockwise, starting at the dot on the map, each loop holding the last 2 Back stitch · SZ34 Chocolate · Main disc work the outline clockwise, starting at the dot on the map 3 Couching · SZ35 Toffee · Seed lattice inside it lay the long threads first, then tie them down with tiny crosses 4 Back stitch · SZ25 Pine · Side bud work each outline clockwise, starting at the dot on the map 5 Stem stitch · SZ23 Olive · Two parting stems work each line left to right, one at a time, thread always on the same side 6 Back stitch · SZ24 Leaf Green · Three leaves work each outline anticlockwise, starting at the dot on the map 7 French knot · SZ38 Mustard · Scattered knots work the knots last, on the printed spotsYou need
2 strands · embroidery needle size 7 · 15 cm hoop · SZ21 Sunflower 3.0 m · SZ34 Chocolate 50 cm · SZ35 Toffee 60 cm · SZ25 Pine 80 cm · SZ23 Olive 80 cm · SZ24 Leaf Green 60 cm · SZ38 Mustard 40 cmWork order
- Main bloom rays (1)
- Main disc (2)
- Side bud (4)
- Two parting stems (5)
- Three leaves (6)
- Seed lattice inside it (3)
- Scattered knots (7)

Drawn for canvas, where thin lines vanish: one oversized head, twelve broad rays, a coarse open lattice in the disc and two bold leaves off a thick stem stub, the whole panel over fourteen centimetres across. No detail smaller than five millimetres.
Stitch key
1 Chain stitch · SZ21 Sunflower · Oversized rays work each outline anticlockwise, starting at the dot on the map, each loop holding the last 2 Back stitch · SZ34 Chocolate · Broad disc rim work the outline clockwise, starting at the dot on the map 3 Couching · SZ35 Toffee · Coarse lattice lay the long threads first, then tie them down with tiny crosses 4 Back stitch · SZ24 Leaf Green · Two bold leaves work each outline anticlockwise, starting at the dot on the map 5 Stem stitch · SZ23 Olive · Thick stem stub work the line left to right, thread always on the same sideYou need
2 strands · embroidery needle size 7 · any hoop or frame that clears the drawing · SZ21 Sunflower 4.2 m · SZ34 Chocolate 70 cm · SZ35 Toffee 90 cm · SZ24 Leaf Green 70 cm · SZ23 Olive 40 cmWork order
- Oversized rays (1)
- Broad disc rim (2)
- Two bold leaves (4)
- Thick stem stub (5)
- Coarse lattice (3)
How to read one of these transfers
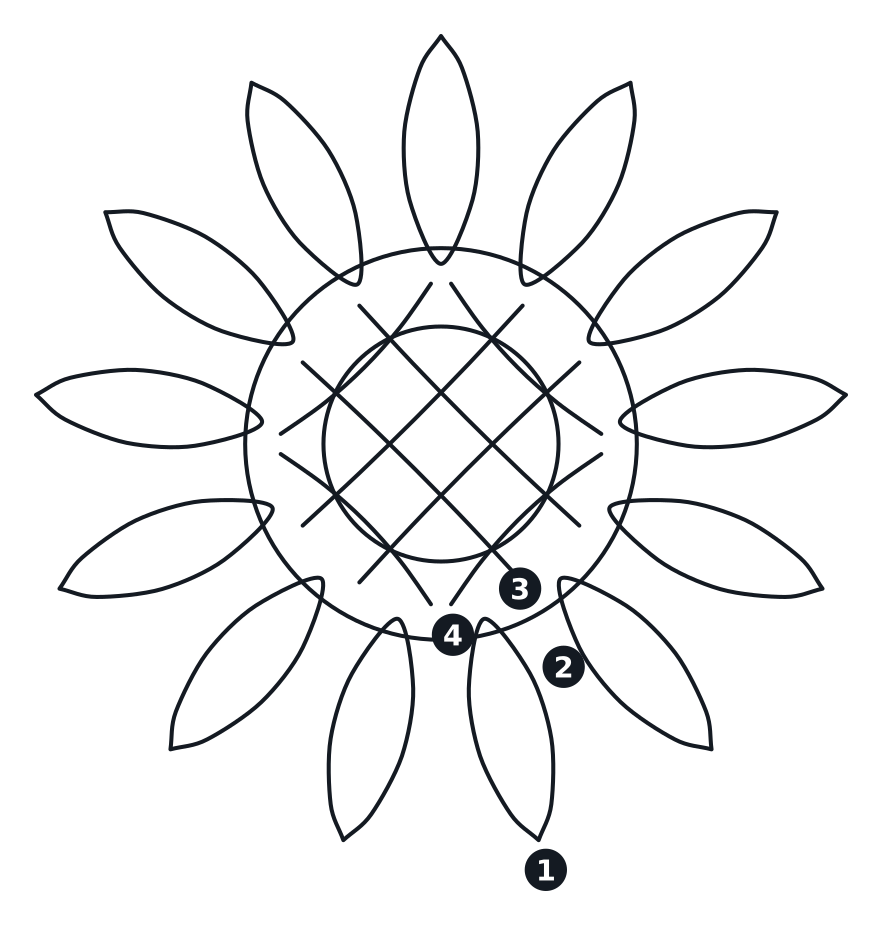
- The drawing is a transfer, not a chart. Print it at 100 per cent and it comes out at the finished size printed on the card.
- Every numbered circle points at one line of the drawing. The stitch key gives that number a stitch, a thread code and a colour.
- A closed shape in the key marked satin stitch is meant to be filled solid. Everything else is worked along the line itself.
- Trace it with a water soluble pen against a window or a lightbox, or tack tissue paper over the fabric and tear it away afterwards.
Stitches on this page
Twelve stitches grow every sunflower on this page, and the disc textures are where they earn their keep: lattice, knots and seed all stand in for the seed head. Each diagram numbers the needle moves, and under it is the sunflower that puts that stitch to work, so the practice piece is also a finished one.
Back stitch
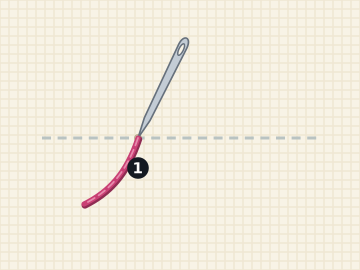
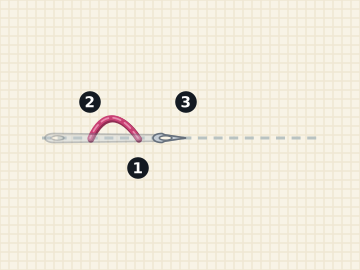
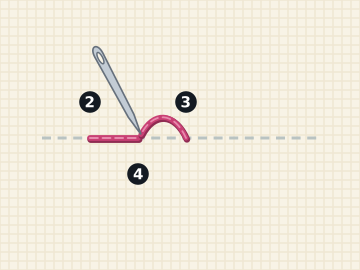
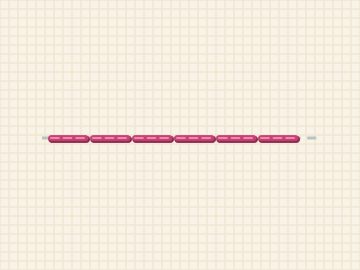
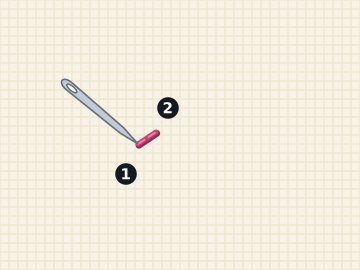
The Beginner Outline Sunflower is back stitch nearly throughout, and the Minimal Sunflower keeps to it on sheer cloth.
Straight stitch
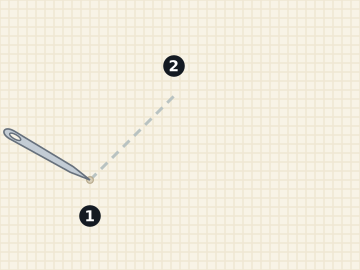
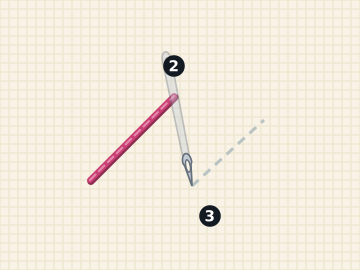
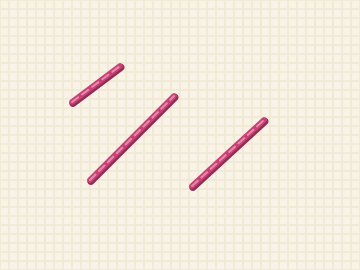
The Geometric Sunflower spokes its disc with straight stitches, not a curve anywhere.
Stem stitch
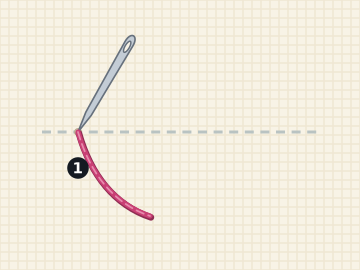
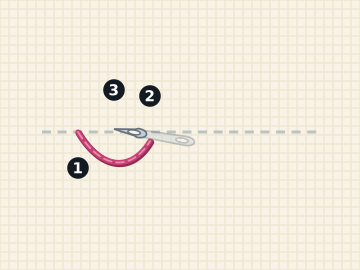
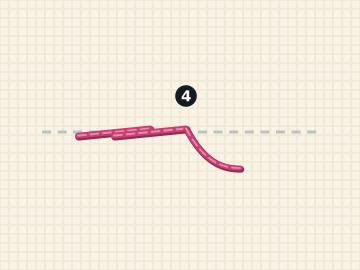
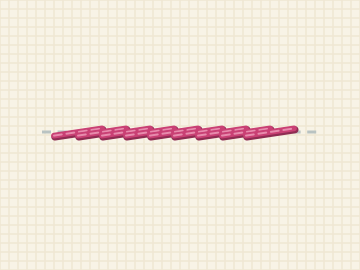
The Nodding Seed Head bends its thick stalk in stem stitch, and the Crossed Stems page it twice over.
Split stitch
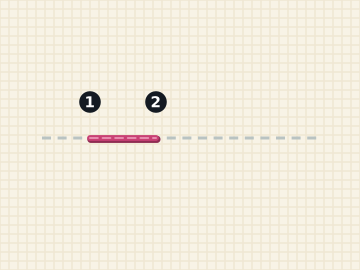
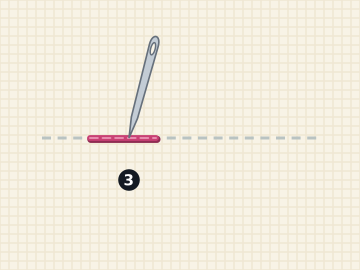
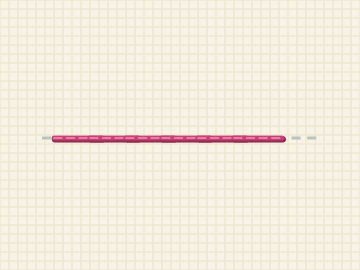
The Sunflower Leaf Study veins its big heart leaves in split stitch, one lateral at a time.
Chain stitch
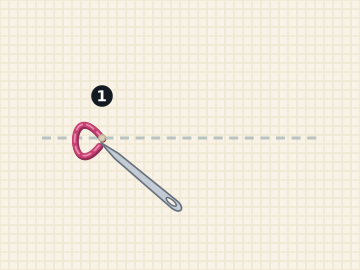
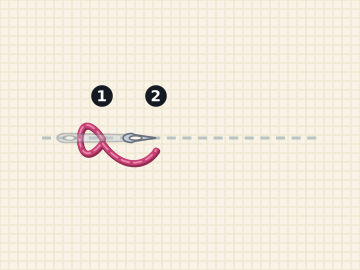
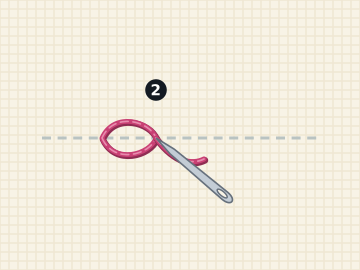
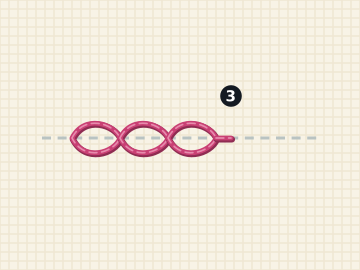
The Classic Open Sunflower chains all thirteen rays, and the Chain Stitch Sunflower chains rays and leaves alike.
Whipped back stitch
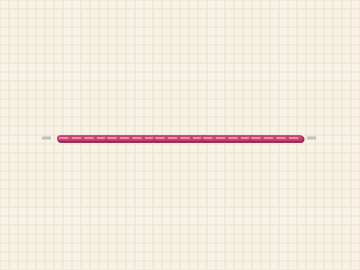
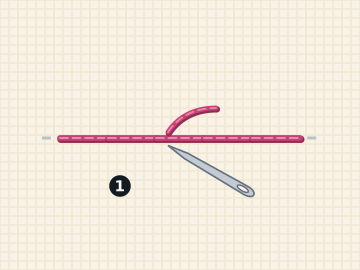
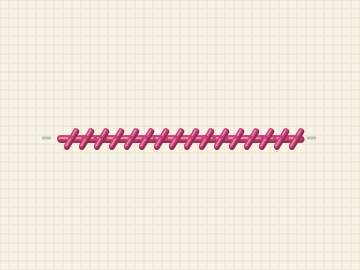
The Chain Stitch Sunflower whips its disc rim so the circle reads as one raised ring.
Lazy daisy
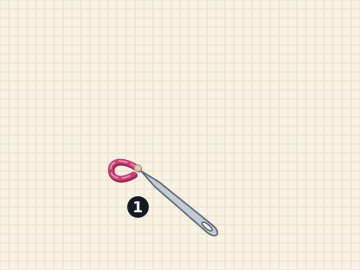
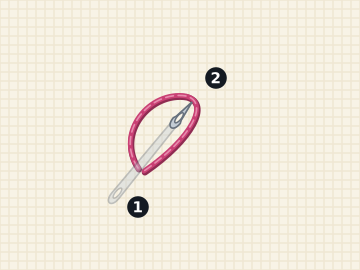
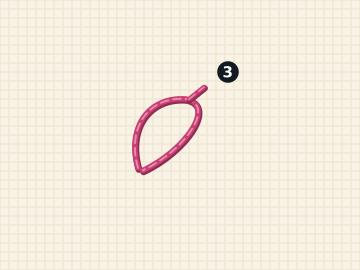
The Folk Art Sunflower alternates loop petals round its head, and the Sunflower Corner tips its leaves with them.
Satin stitch
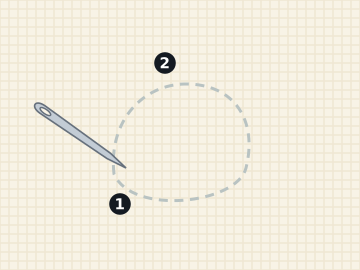
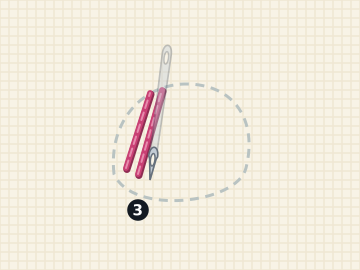
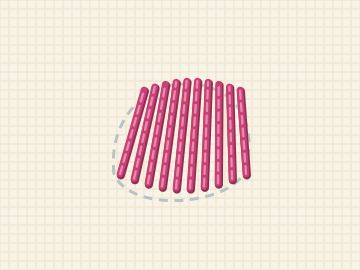
The Satin Stitch Sunflower closes every ray so each fills solid gold, edge to edge.
Long and short stitch
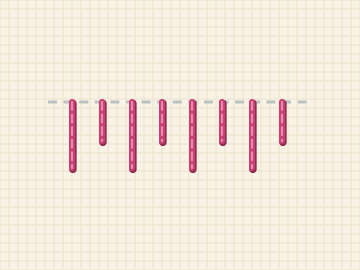
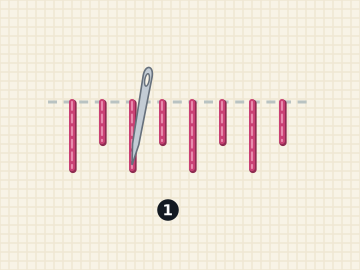
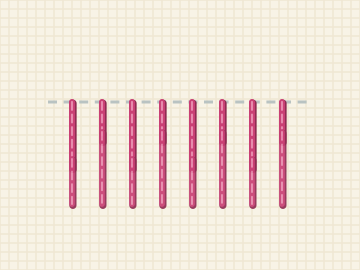
The Shaded Sunflower bands its broad petals so the yellow deepens toward the disc.
French knot
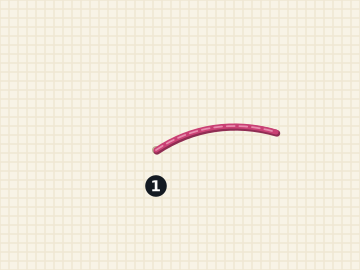
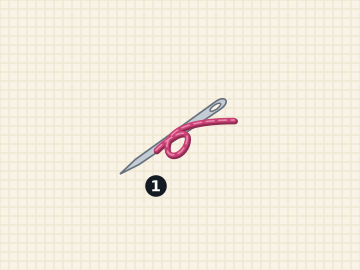
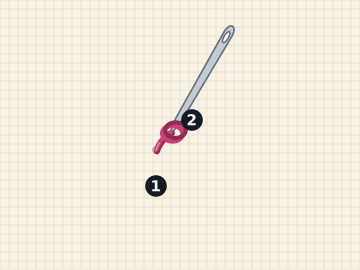
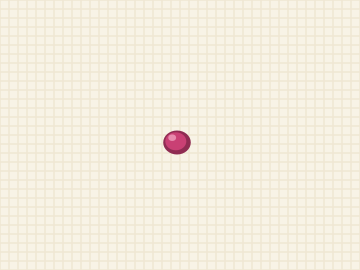
The French Knot Sunflower prints every knot position on its disc, dense in the middle, opening to the rim.
Seed stitch
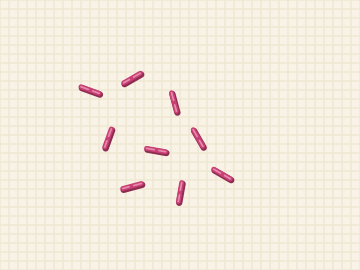
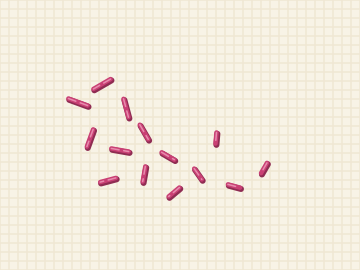
The Seed Stitch Sunflower ripens its disc with seeds sown thick at the centre and thin at the edge.
Couching
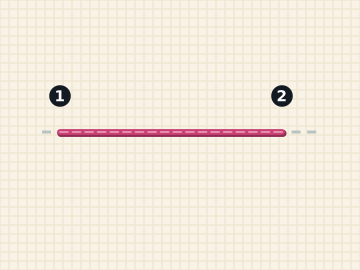
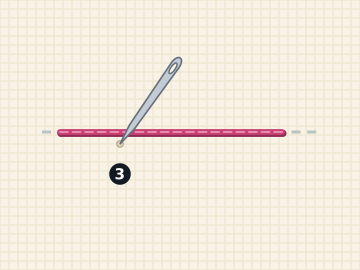
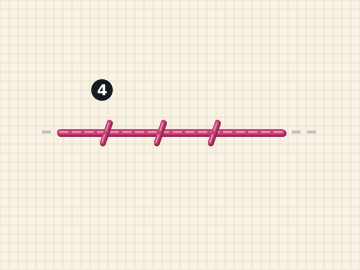
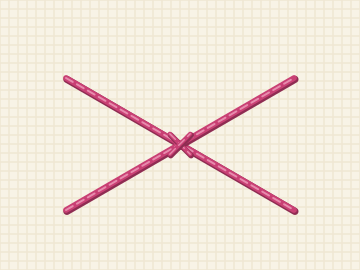
The Couched Lattice Sunflower crosses its disc with laid threads and ties every crossing, which is the classic seed head.
What is on this page
These are surface embroidery transfers, not counted charts. Each one is a line drawing you print at actual size, trace onto fabric and stitch along freehand, with a numbered circle on every part of the drawing and a key that turns each number into a stitch, one of our thread codes and a plain colour name. Nothing on a sheet is unlabelled and no key row points at a line that is not there, which is checked before publication rather than hoped for afterwards.
There are 32 sunflowers here in six groups. Head shape and arrangement are about what you are making, foliage is about the half of the plant most patterns forget, linework is about how much drawing the sheet carries, technique is about what it will teach you, and size is about where it is going. Finished sizes run from 32 millimetres to a panel over fourteen centimetres across.
What makes a drawing read as a sunflower
Three things, and every sheet on this page is built round them. The disc is huge: on a real head the brown centre is roughly half the width of the whole flower, and the moment it shrinks the drawing turns into a daisy no matter what the petals do. The rays are lances, drawn with sharp tips in one or two staggered rows, because rounded tips read as a gerbera and six fat petals read as a child's sun. And the leaves are broad toothed hearts on a genuinely thick stem: a sunflower stalk drawn as a single stroke turns the tallest flower in the garden into a lollipop.
Giving the disc its texture
An empty circle is the weakest part of most sunflower embroidery, so the discs here carry their plan printed on the sheet. Some cross the circle with a lattice of long laid threads, each crossing fastened down with a tiny stitch, which is couching used for exactly the thing couching is best at. Others mark every French knot position on a spaced walk, so the knots come out even instead of crowding the middle, and one design grades seed stitch from dense at the centre to open at the rim, which is how a ripe head actually ripens. Work whichever texture the key names after the rim and before the rays.
Which sunflower to start with
If you have never done surface embroidery, start with the beginner outline sunflower: every line in it is back stitch, stem stitch or split stitch, there is no filling anywhere, and the build refuses to publish a beginner sheet that quietly uses satin or a knot. The tiny pocket flower is 32 millimetres wide and finishes in an evening, and the minimal eight ray version is the next step up. The bouquet, the wreath and the shaded head are afternoon and weekend pieces, in that order.
How to get the drawing onto the fabric
Print at 100 per cent with fit to page switched off, or the sizes printed on the card stop being true. Tape the sheet to a sunny window, tape the cloth over it and trace the lines with a water soluble pen; a tablet showing a white screen does the same job after dark. On thick or dark fabric, trace onto tissue paper instead, tack it to the cloth, stitch through both layers and tear the paper away. Two strands of six strand cotton suit everything here unless the pattern says otherwise, and the pocket and cuff pieces are clearer in one.
Threads, hoops and finished size
Every pattern lists its threads with our own codes and plain colour names, so you can match them against whatever yellows and browns are already in your box rather than buying a specific catalogue number. The finished size on each card is measured off the drawing itself and the sheet is scaled to it, so a head that says nine centimetres really is nine centimetres on paper. Where a design was drawn for a hoop, the sheet prints that hoop as a dashed circle so you can centre the fabric before the first stitch goes in.
Every design here is our own
Not one of these drawings is traced, scanned, bought or lifted from another designer's transfer. They are built out of curves written by hand in code, which is why they can be free, and the plain-language license confirms you can stitch them, print them, teach with them and sell the pieces you make. The rose embroidery patterns page is the other flower on this side of the site and uses the same numbered key, the cat embroidery patterns and butterfly embroidery patterns pages are drawn to the same weight, the cross stitch patterns page is the counted half of this site, and the Pattern Maker will chart a picture of your own onto a grid in a few seconds.
How to use these embroidery transfers
- Print the PDF at 100 per cent. The drawing is actual size, so it fits the hoop the pattern names without any scaling.
- Trace the lines onto your fabric, then put it in the hoop drum tight. Two strands of stranded cotton is the default here unless the pattern says otherwise.
- Work the numbers in order: outlines first, filled shapes next, knots last, so nothing already stitched gets flattened under your hand.