Beginner cross stitch patterns
Twenty four small charts in five groups, none of them wider than twenty squares and none using more than four threads: mini designs that finish in an hour, two colour charts, three and four colour charts, bands for a bookmark and framed motifs for a card.
24 free patterns ·
Drawn and checked by  Ivy Skein
What makes a cross stitch pattern good for a beginner?
A small grid, few colours and solid blocks of stitches rather than single scattered ones. Every chart here is twenty squares across or less and uses at most four threads, so you count short rows, change colour rarely and watch the picture appear, which is what keeps a first project moving.
Mini charts, twelve squares or less
Five charts that stop at eleven squares across, which is under 2 cm finished on 14 count aida. Every one is two colours and under a hundred stitches, so it goes from a bare scrap of fabric to a finished piece in about an hour. They are filed by size rather than by colour count, because size is what makes them the honest answer to a first project.


Two colour charts
Five designs worked in exactly two threads at the normal beginner size, between fourteen and twenty squares across. Two colours is where a chart stops being a shape and starts being a picture: one thread fills and the second outlines, and the outline is what makes a heart look like a heart rather than a red lump.


Three and four colour charts
Seven charts that add a third and a fourth thread, which is where you learn to park one colour and pick up another without losing your place. Still no shading and still solid blocks, but the cottage has a roof, walls, windows and a door in four separate colours, and keeping those four apart is the whole exercise.


Bookmark bands
Three long narrow bands sized to run down a bookmark, thirteen to fifteen squares wide and charted as one unit repeated three or four times. Nothing forces you to stop where the chart does: count the unit once, mark where it starts again, and carry it as far down the strip as you want.


Charts for a card or a gift tag
Four designs that come with their own border, a single line of stitches nineteen squares wide and twenty three deep, so the finished piece already has an edge and does not need mounting to look done. That border is also a counting exercise worth doing early: get the frame right and the motif inside it cannot drift.


How to read one of these charts
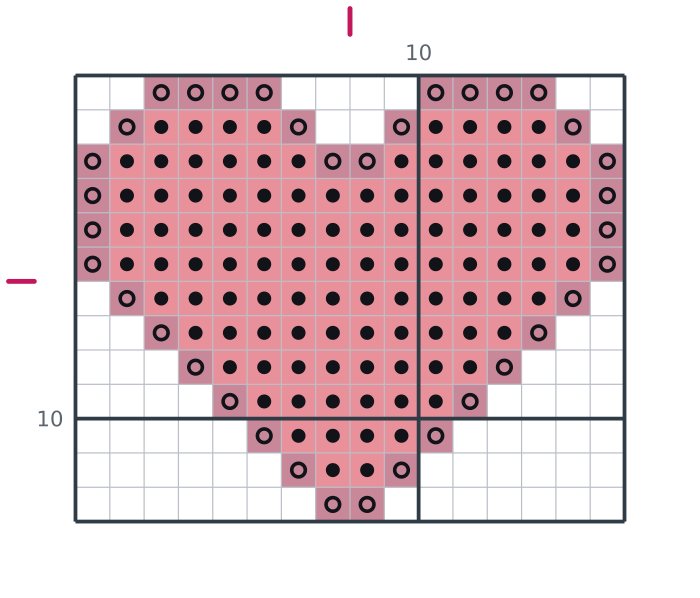
- One square is one full cross stitch, one bead or one pixel. The symbol in the square tells you which colour goes there.
- The heavy lines every ten squares are counting lines. Count in tens and a miscount shows up in the same row it happened.
- The small marks on the top and left edges mark the centre of the design, which is where most people start.
- The key under the chart lists every symbol with its colour, our thread code and how many squares of it the design uses.
Why these charts are easier
Three things make a first chart hard: a big grid, a long colour list and single stitches dotted about that are easy to miscount. Every design on this page avoids all three. The grids stop at 20 squares across, the colour lists stop at four, and the shapes are drawn as solid blocks so a mistake is visible immediately rather than ten rows later.
There are 24 charts here in five groups. Two of the groups are about colour, which is the thing that actually decides how hard a chart feels: five worked in exactly two threads, and seven that go up to four. One group is about size, the mini charts, which stop at eleven squares and finish in about an hour. The last two are about what you end up holding, a bookmark or a card, because a first piece is far more likely to get finished when it has somewhere to go.
What you need
A scrap of 14 count aida, a size 24 tapestry needle, a small hoop and the two to four colours the chart lists. Nothing here needs a full skein of anything. Start at the centre marks on the edges of the chart, work one colour at a time, and count in tens using the heavy guide lines.
Every stitch on this page is a whole cross
Nothing here asks for a backstitch outline, a half stitch or a quarter stitch. Every square on every chart is one full cross in one colour, which means there is a single technique to learn before you can work any design on the page, and no chart will suddenly demand a second one halfway down. It also means the chart and the key always agree with each other: if a square carries a symbol you make a cross there, and if it is blank you leave the fabric alone. That is the whole reading rule, and it does not change from the smallest chart to the longest.
Turning a chart into a bookmark or a card
The bookmark bands are charted as one unit repeated three or four times, so the chart tells you what the repeat is rather than how long the finished piece has to be. Count the unit once, mark where it begins again, and keep going until the band matches your strip. The card designs work the other way round: the border is fixed at 19 squares by 23, which is roughly 3.4 by 4.2 cm on 14 count and sits inside a standard aperture card without trimming. On those, stitch the border first, because once the frame is counted the motif inside it cannot wander.
Where to go next
When counting feels automatic, the full cross stitch patterns page has larger designs with shading and more colours, and the cross stitch alphabet lets you add a name or a date to anything you have already made. All of it is free under the same license, including selling the pieces you stitch yourself.
How to use these cross stitch charts
- Download the PDF and print it at 100 per cent on A4 or Letter paper. Black and white at normal quality is enough.
- Find the centre of your fabric and the centre marks on the chart, then work outwards colour by colour.
- The finished size printed on each pattern is measured on 14 count aida. Finer fabric makes the same chart smaller, not shorter.