Cross stitch alphabet

One alphabet, drawn to a single cap height and stroke weight, so letters sit level when you spell a name instead of wandering up and down.

How do I stitch a name from an alphabet chart?

Count the width of every letter, add one blank square between letters and three between words, then centre that total on your fabric before you start. Because every capital here shares one cap height and one baseline, the finished name sits level, which is exactly where mixed alphabets go wrong.

Capital letter A cross stitch alphabet chart with a wide apex and a waist crossbar Letter A Cross Stitch Pattern The apex is four stitches wide so the two splayed legs meet cleanly at the top, and the crossbar sits on the same two rows as the bar of H, which keeps a stitched word on one waistline. 12 x 14 grid 71 stitches 2 colours 2.2 x 2.5 cm Chart PDF View chart
Capital letter B cross stitch alphabet chart with two stacked bowls on one stem Letter B Cross Stitch Pattern Two stacked bowls share a single stem and the lower bowl is drawn one stitch wider than the upper one, which is what stops B reading as R once it is worked in thread. 12 x 14 grid 79 stitches 2 colours 2.2 x 2.5 cm Chart PDF View chart
Capital letter C cross stitch alphabet chart drawn as an open horseshoe Letter C Cross Stitch Pattern An open horseshoe with matching top and bottom curves, cut away on the right for four stitches so the aperture stays generous next to the closed ring of O. 12 x 14 grid 55 stitches 2 colours 2.2 x 2.5 cm Chart PDF View chart
Capital letter D cross stitch alphabet chart with a straight stem and a stepped bowl Letter D Cross Stitch Pattern A straight stem carrying one deep bowl whose corners are stepped back twice on the right, so the curve reads as round rather than as the plain rectangle a beginner usually ends up with. 12 x 14 grid 70 stitches 2 colours 2.2 x 2.5 cm Chart PDF View chart
Capital letter E cross stitch alphabet chart with three arms and a short waist arm Letter E Cross Stitch Pattern Three arms on one stem, with the waist arm pulled in two stitches shorter than the top and foot arms so the letter still reads as E and not as a solid block of navy. 12 x 14 grid 77 stitches 2 colours 2.2 x 2.5 cm Chart PDF View chart
Capital letter F cross stitch alphabet chart with a top arm and a waist arm Letter F Cross Stitch Pattern The E with its foot arm removed, which leaves the stem carrying the whole ten row cap height alone while the waist arm stays level with every other waist in the set. 12 x 14 grid 60 stitches 2 colours 2.2 x 2.5 cm Chart PDF View chart
Capital letter G cross stitch alphabet chart with a spur bar and a short right stem Letter G Cross Stitch Pattern The C horseshoe with a spur: the bar runs out to the right edge across two rows and turns down into a short stem, and that turn is the entire difference between G and C. 12 x 14 grid 69 stitches 2 colours 2.2 x 2.5 cm Chart PDF View chart
Capital letter H cross stitch alphabet chart with two stems and a waist crossbar Letter H Cross Stitch Pattern Two full height stems joined by a crossbar on rows five and six, the same rows used by A and E, so all three letters share one continuous waistline in a stitched name. 12 x 14 grid 71 stitches 2 colours 2.2 x 2.5 cm Chart PDF View chart
Capital letter I cross stitch alphabet chart with slab bars at the top and foot Letter I Cross Stitch Pattern A narrow centre stem finished with a full slab bar at the top and another at the foot, which gives the thinnest letter here enough body to hold its place beside M and W. 12 x 14 grid 53 stitches 2 colours 2.2 x 2.5 cm Chart PDF View chart
Capital letter J cross stitch alphabet chart with a top slab bar and a left hook Letter J Cross Stitch Pattern A slab bar across the top, then a stem that drops the full cap height and turns left into a two stitch hook that lands square on the baseline. 12 x 14 grid 55 stitches 2 colours 2.2 x 2.5 cm Chart PDF View chart
Capital letter K cross stitch alphabet chart with an arm and a leg meeting the stem Letter K Cross Stitch Pattern One straight stem with an arm and a leg that meet it at the waist, both stepped two stitches wide so the diagonals carry exactly the same weight as the stem. 12 x 14 grid 60 stitches 2 colours 2.2 x 2.5 cm Chart PDF View chart
Capital letter L cross stitch alphabet chart with one stem and a full width foot Letter L Cross Stitch Pattern The plainest letter in the alphabet, a single stem and a full width foot, which makes it the sensible place to start if this is the first chart you have stitched. 12 x 14 grid 48 stitches 2 colours 2.2 x 2.5 cm Chart PDF View chart
Capital letter M cross stitch alphabet chart, ten stitches wide with an inner V Letter M Cross Stitch Pattern Ten stitches wide rather than eight, with an inner V that steps down to the middle of the letter and leaves both counters open, which is what keeps M from reading as an upturned W. 12 x 14 grid 80 stitches 2 colours 2.2 x 2.5 cm Chart PDF View chart
Capital letter N cross stitch alphabet chart with a stepped diagonal between two stems Letter N Cross Stitch Pattern The diagonal walks from the top of the left stem to the foot of the right one in two stitch runs, so the stroke never thins to a single thread anywhere along its length. 12 x 14 grid 73 stitches 2 colours 2.2 x 2.5 cm Chart PDF View chart
Capital letter O cross stitch alphabet chart drawn as a closed rounded ring Letter O Cross Stitch Pattern A closed ring with the corners cut back twice at all four turns, which rounds it just enough to sit beside C and G without any of the three looking like a square. 12 x 14 grid 66 stitches 2 colours 2.2 x 2.5 cm Chart PDF View chart
Capital letter P cross stitch alphabet chart with one bowl on the upper stem Letter P Cross Stitch Pattern A single bowl on the upper half of the stem, closing at the waist, with the lower half of the stem left completely bare so that P stays clearly apart from R. 12 x 14 grid 62 stitches 2 colours 2.2 x 2.5 cm Chart PDF View chart
Capital letter Q cross stitch alphabet chart with a ring and a stepped tail Letter Q Cross Stitch Pattern The O ring exactly as drawn on its own chart, plus a tail that steps down and to the right past the baseline, making this the only descender in the alphabet. 12 x 14 grid 72 stitches 2 colours 2.2 x 2.5 cm Chart PDF View chart
Capital letter R cross stitch alphabet chart with a bowl and a splayed leg Letter R Cross Stitch Pattern The P bowl with a leg that splays from the waist out to the baseline and lands one stitch beyond the bowl, which is the detail that keeps R and B apart at small sizes. 12 x 14 grid 71 stitches 2 colours 2.2 x 2.5 cm Chart PDF View chart
Capital letter S cross stitch alphabet chart with a double curve and a waist bar Letter S Cross Stitch Pattern A double curve whose top terminal closes to the right and whose foot terminal closes to the left, with a waist bar carrying the turn between them. 12 x 14 grid 75 stitches 2 colours 2.2 x 2.5 cm Chart PDF View chart
Capital letter T cross stitch alphabet chart with a slab top bar and centred stem Letter T Cross Stitch Pattern A full width slab across the top and a centred stem beneath it, sharing its bar height with Z and its stem width with I. 12 x 14 grid 48 stitches 2 colours 2.2 x 2.5 cm Chart PDF View chart
Capital letter U cross stitch alphabet chart with two stems and a rounded foot Letter U Cross Stitch Pattern Both stems run the full cap height and then turn into a rounded foot that is stepped back twice, so the base is a curve and not the flat foot of an L. 12 x 14 grid 64 stitches 2 colours 2.2 x 2.5 cm Chart PDF View chart
Capital letter V cross stitch alphabet chart with two diagonals meeting in a point Letter V Cross Stitch Pattern Two diagonals converge on a two stitch point at the baseline, dropping one column every two rows so the left and right sides stay perfectly symmetrical. 12 x 14 grid 54 stitches 2 colours 2.2 x 2.5 cm Chart PDF View chart
Capital letter W cross stitch alphabet chart, ten stitches wide with an inner peak Letter W Cross Stitch Pattern The M turned over: two upright stems with an inner peak rising from the baseline, drawn ten stitches wide like the M so a name carrying both letters keeps an even colour. 12 x 14 grid 80 stitches 2 colours 2.2 x 2.5 cm Chart PDF View chart
Capital letter X cross stitch alphabet chart with two diagonals crossing at the waist Letter X Cross Stitch Pattern Two diagonals cross at the waist, each stepping one column per row in from a two stitch terminal, which keeps the crossing point solid instead of pinched. 12 x 14 grid 55 stitches 2 colours 2.2 x 2.5 cm Chart PDF View chart
Capital letter Y cross stitch alphabet chart with a fork above a centred stem Letter Y Cross Stitch Pattern The top half of X carried down into a centred stem, so the fork sits at the same waist height as the crossbars of A, E and H. 12 x 14 grid 43 stitches 2 colours 2.2 x 2.5 cm Chart PDF View chart
Capital letter Z cross stitch alphabet chart with two slab bars and a wide diagonal Letter Z Cross Stitch Pattern A slab bar top and foot with a three stitch diagonal strung between them, wide enough that the middle of the letter reads as solid as the two bars. 12 x 14 grid 75 stitches 2 colours 2.2 x 2.5 cm Chart PDF View chart
Numbers 0 to 9 cross stitch chart in the same style as the alphabet letters Numbers 0 to 9 Cross Stitch Pattern The ten digits on one grid at the same stroke weight and cap height as the letters, set on a seven stitch pitch so dates, house numbers and birth years line up with a stitched name. 70 x 14 grid 571 stitches 2 colours 12.7 x 2.5 cm Chart PDF View chart
Cross stitch alphabet sampler chart with all 26 capital letters laid out in rows Full Alphabet Sampler Cross Stitch Pattern All 26 capitals on one chart in rows of six, for stitching a whole alphabet sampler or for checking letter widths before you plan a name. 72 x 70 grid 1686 stitches 2 colours 13.1 x 12.7 cm Chart PDF View chart

How to read one of these charts
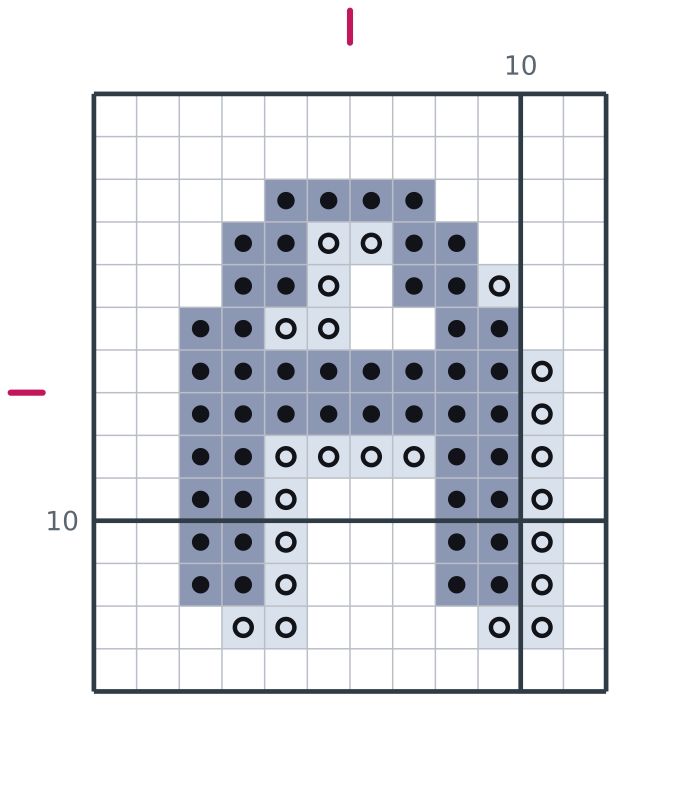
Capital letter A cross stitch alphabet chart with a wide apex and a waist crossbar
Letter A Cross Stitch Pattern, charted at 12 by 14 squares
  • One square is one full cross stitch, one bead or one pixel. The symbol in the square tells you which colour goes there.
  • The heavy lines every ten squares are counting lines. Count in tens and a miscount shows up in the same row it happened.
  • The small marks on the top and left edges mark the centre of the design, which is where most people start.
  • The key under the chart lists every symbol with its colour, our thread code and how many squares of it the design uses.

One alphabet, not twenty six drawings

Most free letter charts are collected from different sources, which is why a name stitched from them comes out with letters of different heights and weights. This alphabet is drawn as one family: every capital sits on the same baseline, uses the same cap height, the same two square stroke and the same soft shadow, so any combination of letters looks intentional.

Two letters break the width, and both breaks are standard in real lettering: M and W are wider than the rest so their inner angles stay open, and Q is the only letter that drops below the baseline. Everything else fits the same 12 square canvas.

Planning a name before you stitch it

Write out the letters, add up their widths, then add one square between letters and three between words. Compare that total with the width of your fabric in squares, and mark the centre of the line before the first stitch goes in. Working outwards from the middle of the word, rather than left to right, keeps a long name centred.

What to use it on

Names on a hoop, initials in the corner of a larger piece, a date under a sampler, a school label, a monogram on a bag. The letters are drawn to the same weight as the designs on the cross stitch patterns page, so a name and a motif can share one piece without clashing. If you want something small to put the letters on first, the beginner patterns are the fastest route. Everything is free to print and use under the plain-language license.

How to use these cross stitch charts

  1. Download the PDF and print it at 100 per cent on A4 or Letter paper. Black and white at normal quality is enough.
  2. Find the centre of your fabric and the centre marks on the chart, then work outwards colour by colour.
  3. The finished size printed on each pattern is measured on 14 count aida. Finer fabric makes the same chart smaller, not shorter.

Make a chart from your own picture

More patterns

Cross stitch

Perler beads

Pixel art