Free perler bead patterns
Thirty printable bead charts in five groups, sorted by the two things that decide whether you can actually make one: how many beads it eats, and what shape of board it was drawn for.
30 free patterns ·
Drawn and checked by  Ivy Skein
Do these perler bead patterns fit a standard pegboard?
Most do, and four are drawn not to. Twenty six of the thirty designs here are 29 pegs or fewer in each direction, which is one standard square pegboard, including the round and hexagon groups. The last four run 34 to 36 pegs wide on purpose, to be laid across two boards pushed together and fused in a single press.
Light designs, under 350 beads
Seven charts between 236 and 340 beads, which is roughly what one small bag of a colour covers and about forty minutes of laying out. The rainbow is the lightest thing on the page at 236 beads across 22 pegs, because six single bead bands and one cloud leave most of the board bare.


Dense designs, 350 beads and up
Nine charts from 350 beads up to 454, filled in almost corner to corner, and the group to count your stash against before you start: the panda alone wants 430 beads in three colours and the robot 454 in six. A dense design also fuses more evenly, because every bead has a neighbour holding it flat.


Cut to a round pegboard
Six charts drawn as a circle rather than as a rectangle. The pegs on a round board sit in the same square grid as on any other board, so the chart is read exactly the same way. What changes is that the drawing is planned to finish where the board finishes, which is why a clock, a moon, a globe and a basketball are here and a house is not.


Cut to a hexagon pegboard
Four charts cut to a hexagon, 21 pegs across and 19 down. Six sides reward six fold subjects, so each of these has six of something: seven honeycomb cells, six snowflake arms, six petals, six facets. Made in a set they tile the way hexagons do, edge to edge with no gaps and no wasted corners.


Wide designs that span two boards
Four charts wider than 29 pegs, which means they do not fit one board and are not meant to. Push two square boards together, lay the design across the join and fuse the lot in one press. The camper van and the steam train are 36 pegs long and the sausage dog 34, and none is more than 22 deep, so two boards side by side are always enough.


How to read one of these charts
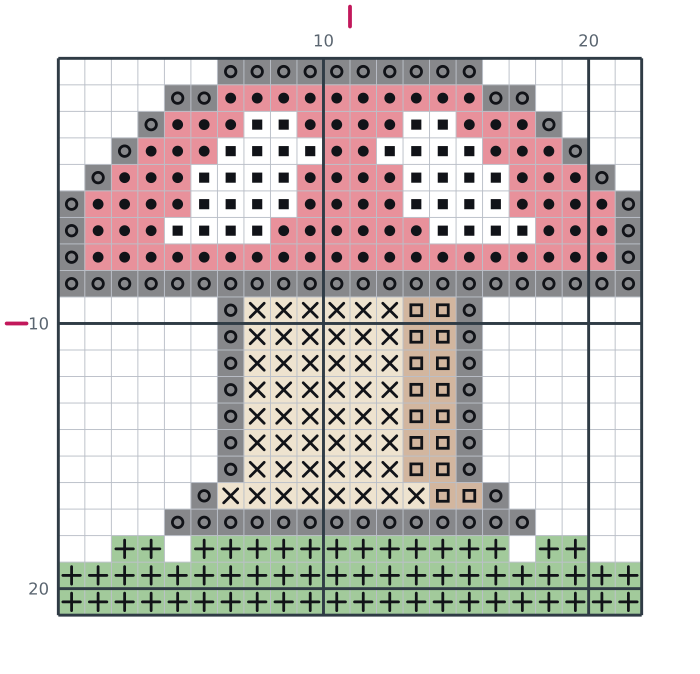
- One square is one full cross stitch, one bead or one pixel. The symbol in the square tells you which colour goes there.
- The heavy lines every ten squares are counting lines. Count in tens and a miscount shows up in the same row it happened.
- The small marks on the top and left edges mark the centre of the design, which is where most people start.
- The key under the chart lists every symbol with its colour, our thread code and how many squares of it the design uses.
What these patterns are
A perler bead pattern is a grid where one square is one bead. Every chart on this page prints with a symbol in each square and a key that names the colours, so you can follow it in black and white and still know which bead goes where.
There are 30 charts here in five groups, and the groups are not subjects. Two of them are bead count, because that is what tells you whether you have enough of a colour before you start: seven light designs under 350 beads and nine dense ones above it. The other three are the shape of the board the design was drawn for: six cut to a circle, four cut to a hexagon, and four drawn deliberately too wide for any single board.
Round boards, hexagon boards and the same square grid
A shaped pegboard does not change how a chart is read. The pegs still sit in a plain square lattice at the same 5mm spacing; only the outline of the plastic changes. What a shaped board does change is what is worth drawing on it. On a square board a circular design wastes four corners, and on a round board a square design will not fit at all, so the six round charts here are planned as circles from the first bead: a clock face, a compass rose, a full moon, a globe, a basketball and a four hole button whose holes are real gaps in the beadwork. The hexagon group goes further and takes the six sidedness as the subject, which is why every design in it has six of something.
Laying a design across two boards
Standard square pegboards interlock along their edges, and that is the feature the last group uses. Push two together on a flat surface until the tabs meet, check that the peg spacing runs straight across the join with a ruler before you place a single bead, and then lay the design out as if the seam were not there. Iron it in one pass with the paper covering the whole piece, working from the middle outward so the two halves cannot drift apart, and let it cool flat under a book. A join fused in two separate presses is where a wide piece breaks, so it is worth clearing the table and doing it once.
Perler, hama or melty beads
They are the same craft under different brand and regional names. What matters is the bead diameter, and these charts are drawn for the standard 5mm size, so any 5mm fuse bead works. Set the beads out on the board, cover them with the ironing paper, and press on a medium heat with no steam until the beads just join while their holes are still visible.
The same grid works in thread
A bead grid and a counted cross stitch chart are the same object, so any pattern here can be worked in thread on 14 count aida at the finished size printed on the card. If that is what you are after, the cross stitch patterns page is drawn for it directly, and the pixel art templates page has adventure, scenery and space designs on the same square grid.
Why there are no character patterns here
A bead pattern of somebody else's character is a derivative work of their artwork, and this site publishes only designs it draws itself. That is a stricter line than much of this hobby draws, it is deliberate, and it is set out in full on the license page, along with the confirmation that you may sell the pieces you make from these charts.
Looking for something to make rather than a chart to follow
This page is the chart library, sorted by how the chart behaves. If you are still deciding what the beads should become, the perler bead ideas page files the same craft the other way round, by finished object, so you pick the keyring, the coaster or the magnet first and the design second.
And if the answer is a keyring, go straight to the perler bead keychain patterns: those are drawn with the loop hole already in the grid, so a jump ring passes through the fused piece and you never have to melt a hole through a bead afterwards.
How to use these bead patterns
- Print the chart or keep it on a screen beside you, then set the beads out on a standard square pegboard.
- Work one colour at a time from the chart. Every design here fits one board, so nothing has to be joined later.
- Iron through the paper on a medium heat until the beads just join, then cool it flat under a book so it does not curl.
Common questions
Do these patterns fit a standard pegboard?
Twenty six of the thirty do: they are 29 pegs or fewer in each direction, so each one fits on a single standard square pegboard with nothing to join. The four in the last group are 34 to 36 pegs wide on purpose, and are laid across two boards pushed together. The grid size is printed on each card and on the chart, so you can check before you start pulling beads.
How do I lay a design across two pegboards?
Standard square boards interlock along their edges. Push two together on a flat surface until the tabs meet, then run a ruler across the join to check the peg spacing stays even, because a board seated a millimetre out will throw the whole row. Lay the design out as though the seam were not there, cover the lot with the ironing paper and press in one pass from the middle outwards, so the two halves cannot drift apart. A join fused in two separate presses is exactly where a wide piece snaps later.
What is the difference between perler beads, hama beads and melty beads?
They are the same craft under different brand and regional names: small plastic tubes stood on a pegboard and fused with an iron. The bead diameter is the thing that actually matters, and these charts are drawn for the standard 5mm size, so any 5mm bead works whatever the packet calls it.
How do I iron the design without flattening it?
Cover the finished design with the ironing paper, set the iron to medium with no steam, and move it in slow circles for ten to fifteen seconds while you watch the ring of each bead. Stop as soon as the beads have joined but still have a visible hole, then let it cool flat under a book so it does not curl, and repeat on the other side if you want both faces smooth.
Can I use these charts for cross stitch instead?
Yes, and plenty of people do. A bead grid and a counted cross stitch chart are the same object: one square is one bead or one stitch. The PDF chart gives you symbols and a colour key, so you can work it in thread on 14 count aida and it will come out at the finished size printed on the card.
What can I do with the finished pieces?
Anything you like, including selling the ones you made yourself. Coasters, keyrings, magnets and fair stalls are all fine, and no permission or payment is needed. Selling or re-uploading the CHART is the line, and the license page sets it out plainly.
Where are the character patterns?
There are none here and there will not be. A bead pattern of somebody else's character is a derivative work of their artwork, and this site publishes only designs it draws itself. If you want more designs in this style, the pixel art templates page has adventure and scenery subjects on the same grid.