Cat embroidery patterns
Thirty one cat transfers, free and printed at actual size with a numbered stitch key. Pick by pose, subject, drawing style, stitch or finished size.
31 free patterns ·
Drawn and checked by  Ivy Skein
Which cat embroidery pattern should a beginner start with?
Start with the outline cat: every line in it is back stitch or stem stitch and there is no filling anywhere, so one technique carries the whole piece. The tiny pocket corner cat is the fastest, at thirty two millimetres and about an evening from tracing to finished.
The easiest pattern on this page is Tiny Cat Embroidery Pattern for a Pocket Corner. Learn its stitches step by step further down.
By pose
Six positions a cat actually holds, and the group to choose from first, because the pose is what the finished piece will be of. Sitting square on with the tail curled round the front paws, asleep in a ring, walking mid stride, folded into a loaf with every paw hidden, seen from directly behind with the tail straight up, and mid stretch with the chest almost on the floor.

The pose everybody pictures first: sitting square on, front paws together, tail brought round the outside of them and laid along the floor. The body is drawn as a pear rather than a barrel, which is what keeps a sitting cat from reading as a bottle.
Stitch key
1 Chain stitch · SZ05 Charcoal · Head, body and tail outline work each line left to right, one at a time, each loop holding the last 2 Satin stitch · SZ10 Blush Pink · Inner ears fill each shape with parallel strokes laid side to side 3 Satin stitch · SZ39 Fern · Eyes fill each shape with parallel strokes laid top to bottom 4 Straight stitch · SZ06 Soft Black · Slit pupils work each outline clockwise, starting at the dot on the map 5 Back stitch · SZ11 Bubblegum · Nose and mouth work each outline clockwise, starting at the dot on the map 6 Straight stitch · SZ03 Pearl Grey · Whiskers work each line left to right, one at a timeYou need
2 strands · embroidery needle size 7 · any hoop or frame that clears the drawing · SZ05 Charcoal 3.5 m · SZ10 Blush Pink 1.4 m · SZ39 Fern 70 cm · SZ06 Soft Black 30 cm · SZ11 Bubblegum 30 cm · SZ03 Pearl Grey 60 cmWork order
- Head, body and tail outline (1)
- Slit pupils (4)
- Nose and mouth (5)
- Whiskers (6)
- Inner ears (2)
- Eyes (3)

A cat asleep in a ring, head laid down at the front and the tail brought all the way round the outside until the tip reaches the nose. Both eyes are two contented arcs, so the whole face is three short lines and a triangle.
Stitch key
1 Stem stitch · SZ35 Toffee · Curled body work the outline clockwise, starting at the dot on the map, thread always on the same side 2 Stem stitch · SZ35 Toffee · Head work the outline clockwise, starting at the dot on the map, thread always on the same side 3 Satin stitch · SZ16 Peach · Inner ears fill each shape with parallel strokes sloping up to the right 4 Back stitch · SZ34 Chocolate · Closed eyes, nose and mouth work each line left to right, one at a time 5 Straight stitch · SZ03 Pearl Grey · Whiskers work each line left to right, one at a time 6 Chain stitch · SZ20 Tangerine · Tail round the outside work the outline anticlockwise, starting at the dot on the map, each loop holding the lastYou need
2 strands · embroidery needle size 7 · 13 cm hoop · SZ35 Toffee 1.7 m · SZ16 Peach 80 cm · SZ34 Chocolate 30 cm · SZ03 Pearl Grey 50 cm · SZ20 Tangerine 1.2 mWork order
- Curled body (1)
- Head (2)
- Closed eyes, nose and mouth (4)
- Whiskers (5)
- Tail round the outside (6)
- Inner ears (3)

Caught mid stride and seen from the side, with the near legs swung apart and the far pair still planted, which is what makes a walk read as a walk. The tail goes straight up, because a cat that is pleased with itself carries it that way.
Stitch key
1 Back stitch · SZ04 Storm Grey · Body and head outline work each outline clockwise, starting at the dot on the map 2 Back stitch · SZ04 Storm Grey · Legs and paws work each line left to right, one at a time 3 Chain stitch · SZ04 Storm Grey · Upright tail work the outline anticlockwise, starting at the dot on the map, each loop holding the last 4 Satin stitch · SZ06 Soft Black · Eye and nose fill each shape with parallel strokes laid side to side 5 Straight stitch · SZ03 Pearl Grey · Whiskers work each line right to left, one at a time 6 Satin stitch · SZ13 Cherry Red · Collar and bell fill each shape with parallel strokes laid top to bottomYou need
2 strands · embroidery needle size 7 · any hoop or frame that clears the drawing · SZ04 Storm Grey 3.0 m · SZ06 Soft Black 40 cm · SZ03 Pearl Grey 40 cm · SZ13 Cherry Red 60 cmWork order
- Body and head outline (1)
- Legs and paws (2)
- Upright tail (3)
- Whiskers (5)
- Eye and nose (4)
- Collar and bell (6)

Every paw folded away underneath, so the whole animal is one wide dome with a face on the front of it and no legs at all. Four short stripes over the back are the only thing that says which way up it is.
Stitch key
1 Stem stitch · SZ36 Sand · Loaf outline and base work each line left to right, one at a time, thread always on the same side 2 Stem stitch · SZ36 Sand · Head work the outline clockwise, starting at the dot on the map, thread always on the same side 3 Satin stitch · SZ16 Peach · Inner ears fill each shape with parallel strokes sloping up to the right 4 Back stitch · SZ34 Chocolate · Sleepy eyes, nose and mouth work each line left to right, one at a time 5 Straight stitch · SZ03 Pearl Grey · Whiskers work each line left to right, one at a time 6 Back stitch · SZ35 Toffee · Tabby stripes over the back work each line top to bottom, one at a timeYou need
2 strands · embroidery needle size 7 · any hoop or frame that clears the drawing · SZ36 Sand 1.9 m · SZ16 Peach 1.1 m · SZ34 Chocolate 40 cm · SZ03 Pearl Grey 60 cm · SZ35 Toffee 40 cmWork order
- Loaf outline and base (1)
- Head (2)
- Sleepy eyes, nose and mouth (4)
- Whiskers (5)
- Tabby stripes over the back (6)
- Inner ears (3)

The view you get when a cat has decided to ignore you: seen from directly behind, sitting, tail straight up with four rings near the tip and two hind paw pads just visible at the floor. No face at all, and it still reads as a cat.
Stitch key
1 Chain stitch · SZ45 Slate · Head and body from behind work each line left to right, one at a time, each loop holding the last 2 Chain stitch · SZ45 Slate · Upright tail work the outline anticlockwise, starting at the dot on the map, each loop holding the last 3 Back stitch · SZ06 Soft Black · Rings near the tail tip work each line left to right, one at a time 4 Satin stitch · SZ10 Blush Pink · Hind paw pads fill each shape with parallel strokes laid top to bottom 5 Fly stitch · SZ45 Slate · Fur tufts along the back work each line left to right, one at a timeYou need
2 strands · embroidery needle size 7 · any hoop or frame that clears the drawing · SZ45 Slate 3.6 m · SZ06 Soft Black 30 cm · SZ10 Blush Pink 1.5 mWork order
- Head and body from behind (1)
- Upright tail (2)
- Rings near the tail tip (3)
- Fur tufts along the back (5)
- Hind paw pads (4)

The long stretch a cat does on waking: front legs reaching away, chest almost on the floor, rump lifted and the tail flicked up behind. The back is the line that carries it, so it is drawn as one dip and one rise and nothing else.
Stitch key
1 Stem stitch · SZ35 Toffee · Arched body work the outline clockwise, starting at the dot on the map, thread always on the same side 2 Stem stitch · SZ35 Toffee · Head work the outline clockwise, starting at the dot on the map, thread always on the same side 3 Satin stitch · SZ16 Peach · Inner ears fill each shape with parallel strokes laid side to side 4 Back stitch · SZ34 Chocolate · Shut eyes, nose and mouth work each line left to right, one at a time 5 Stem stitch · SZ35 Toffee · Reaching legs and paws work each line top to bottom, one at a time, thread always on the same side 6 Chain stitch · SZ20 Tangerine · Flicked tail work the outline anticlockwise, starting at the dot on the map, each loop holding the last 7 Straight stitch · SZ03 Pearl Grey · Whiskers work each line left to right, one at a timeYou need
2 strands · embroidery needle size 7 · any hoop or frame that clears the drawing · SZ35 Toffee 2.6 m · SZ16 Peach 70 cm · SZ34 Chocolate 30 cm · SZ20 Tangerine 80 cm · SZ03 Pearl Grey 50 cmWork order
- Arched body (1)
- Head (2)
- Shut eyes, nose and mouth (4)
- Reaching legs and paws (5)
- Flicked tail (6)
- Whiskers (7)
- Inner ears (3)
By what is in the drawing
The same animal, but not the same picture. A face on its own drawn large enough to carry slit pupils and a muzzle, a whole cat filled solid as a silhouette, five paw prints crossing the cloth with nothing else, a grown cat beside a kitten at half the height, one playing with a ball of wool, and a head with two paws hooked over the top of a pocket.

Head and nothing else, drawn big enough to carry detail: almond eyes with an upright slit in each, a solid nose, the two curves of the muzzle under it and six whiskers reaching past the edge of the face.
Stitch key
1 Split stitch · SZ05 Charcoal · Head outline work the outline clockwise, starting at the dot on the map 2 Long and short stitch · SZ10 Blush Pink · Inner ears, shaded fill each shape with parallel strokes laid side to side 3 Satin stitch · SZ21 Sunflower · Eyes fill each shape with parallel strokes laid top to bottom 4 Satin stitch · SZ06 Soft Black · Slit pupils fill each shape with parallel strokes laid side to side 5 Satin stitch · SZ11 Bubblegum · Nose, mouth and muzzle fill each shape with parallel strokes laid top to bottom 6 Straight stitch · SZ03 Pearl Grey · Whiskers work each line left to right, one at a timeYou need
2 strands · embroidery needle size 7 · 15 cm hoop · SZ05 Charcoal 1.4 m · SZ10 Blush Pink 5.6 m · SZ21 Sunflower 2.0 m · SZ06 Soft Black 50 cm · SZ11 Bubblegum 80 cm · SZ03 Pearl Grey 1.0 mWork order
- Head outline (1)
- Whiskers (6)
- Inner ears, shaded (2)
- Eyes (3)
- Slit pupils (4)
- Nose, mouth and muzzle (5)

The whole animal filled solid in one thread, seen side on and sitting, with the tail curving away behind. A red collar and a bell are the only things worked on top of the filling, and they are what stop it being a shadow.
Stitch key
1 Satin stitch · SZ06 Soft Black · Filled body fill the shape with parallel strokes laid side to side 2 Satin stitch · SZ06 Soft Black · Filled tail fill the shape with parallel strokes laid side to side 3 Back stitch · SZ13 Cherry Red · Collar over the filling work the line left to right 4 Satin stitch · SZ21 Sunflower · Bell fill the shape with parallel strokes laid side to sideYou need
2 strands · embroidery needle size 7 · any hoop or frame that clears the drawing · SZ06 Soft Black 30.0 m · SZ13 Cherry Red 30 cm · SZ21 Sunflower 30 cmWork order
- Collar over the filling (3)
- Filled body (1)
- Filled tail (2)
- Bell (4)

Five prints crossing the cloth on the diagonal, each one turned a little further than the last so the line wanders the way a real set of prints does. A pad, four toes, and a run of seed stitches linking them.
Stitch key
1 Satin stitch · SZ34 Chocolate · Pads fill each shape with parallel strokes laid side to side 2 Satin stitch · SZ35 Toffee · Toes fill each shape with parallel strokes laid side to side 3 Seed stitch · SZ36 Sand · Trail between the prints scatter the little stitches at changing anglesYou need
2 strands · embroidery needle size 7 · any hoop or frame that clears the drawing · SZ34 Chocolate 5.0 m · SZ35 Toffee 3.5 m · SZ36 Sand 40 cmWork order
- Pads (1)
- Toes (2)
- Trail between the prints (3)

Two cats at two sizes, sitting side by side and both facing out. The kitten is drawn at a little over half the height with a head almost as wide, because a kitten is not a small cat, it is a cat with the wrong head on it.
Stitch key
1 Chain stitch · SZ04 Storm Grey · Grown cat outline work each line left to right, one at a time, each loop holding the last 2 Chain stitch · SZ42 Silver Blue · Kitten outline work each line left to right, one at a time, each loop holding the last 3 Satin stitch · SZ10 Blush Pink · Inner ears, both cats fill each shape with parallel strokes laid side to side 4 Satin stitch · SZ06 Soft Black · Eyes and noses fill each shape with parallel strokes laid top to bottom 5 Straight stitch · SZ03 Pearl Grey · Whiskers work each line left to right, one at a timeYou need
2 strands · embroidery needle size 7 · any hoop or frame that clears the drawing · SZ04 Storm Grey 3.4 m · SZ42 Silver Blue 2.1 m · SZ10 Blush Pink 1.9 m · SZ06 Soft Black 90 cm · SZ03 Pearl Grey 80 cmWork order
- Grown cat outline (1)
- Kitten outline (2)
- Whiskers (5)
- Inner ears, both cats (3)
- Eyes and noses (4)

A ginger cat in profile with a ball of wool at its front paws and the thread already unwound in a loose S under its body. Three crossed loops on the ball are the whole difference between wool and a plain circle.
Stitch key
1 Stem stitch · SZ20 Tangerine · Cat outline work each outline clockwise, starting at the dot on the map, thread always on the same side 2 Stem stitch · SZ20 Tangerine · Legs, paws and tail work each line left to right, one at a time, thread always on the same side 3 Back stitch · SZ34 Chocolate · Eye and nose work each outline clockwise, starting at the dot on the map 4 Straight stitch · SZ03 Pearl Grey · Whiskers work each line right to left, one at a time 5 Chain stitch · SZ29 Cornflower · Ball of yarn work each outline clockwise, starting at the dot on the map, each loop holding the last 6 Whipped back stitch · SZ29 Cornflower · Trailing thread work the line left to right, then whip back over itYou need
2 strands · embroidery needle size 7 · any hoop or frame that clears the drawing · SZ20 Tangerine 3.0 m · SZ34 Chocolate 30 cm · SZ03 Pearl Grey 40 cm · SZ29 Cornflower 1.7 mWork order
- Cat outline (1)
- Legs, paws and tail (2)
- Eye and nose (3)
- Whiskers (4)
- Ball of yarn (5)
- Trailing thread (6)

Only the top of the cat: the head, the eyes just clearing the line and two paws hooked over it, so the edge of a pocket or the hem of a shirt becomes the thing it is hiding behind. The line is worked last, straight over the paws.
Stitch key
1 Couching · SZ36 Sand · The edge it hides behind lay the long threads first, then tie them down with tiny crosses 2 Chain stitch · SZ05 Charcoal · Head work the outline clockwise, starting at the dot on the map, each loop holding the last 3 Satin stitch · SZ10 Blush Pink · Inner ears fill each shape with parallel strokes laid side to side 4 Satin stitch · SZ06 Soft Black · Eyes and nose fill each shape with parallel strokes laid top to bottom 5 Straight stitch · SZ03 Pearl Grey · Whiskers work each line left to right, one at a time 6 Chain stitch · SZ05 Charcoal · Paws over the edge work each outline clockwise, starting at the dot on the map, each loop holding the lastYou need
2 strands · embroidery needle size 7 · any hoop or frame that clears the drawing · SZ36 Sand 50 cm · SZ05 Charcoal 2.2 m · SZ10 Blush Pink 2.2 m · SZ06 Soft Black 1.1 m · SZ03 Pearl Grey 70 cmWork order
- Head (2)
- Whiskers (5)
- Paws over the edge (6)
- Inner ears (3)
- Eyes and nose (4)
- The edge it hides behind (1)
By drawing style
Six cats that differ in how they are drawn rather than in what they show, because a kawaii cat and an art nouveau cat are the same animal and completely different pieces of work. Big eyed and blushing, folk art with a heart on its chest, one unbroken line that never lifts, angular with no curve anywhere, a whiplash tail over a stylised body, and a face with no outline at all.

Drawn to the cute rules and not to the animal: head almost as wide as the body, ears shrunk to half height, eyes taken up to a fifth of the face with a highlight in each, and two peach cheeks under them.
Stitch key
1 Chain stitch · SZ04 Storm Grey · Head and body outline work each line left to right, one at a time, each loop holding the last 2 Satin stitch · SZ10 Blush Pink · Inner ears fill each shape with parallel strokes sloping up to the right 3 Satin stitch · SZ06 Soft Black · Big eyes fill each shape with parallel strokes laid side to side 4 Satin stitch · SZ01 Snow White · Eye highlights fill each shape with parallel strokes laid side to side 5 Back stitch · SZ11 Bubblegum · Nose and smile work each outline clockwise, starting at the dot on the map 6 Satin stitch · SZ16 Peach · Blushed cheeks fill each shape with parallel strokes laid top to bottom 7 Satin stitch · SZ12 Rose · Bow on the ear fill each shape with parallel strokes sloping down to the rightYou need
2 strands · embroidery needle size 7 · any hoop or frame that clears the drawing · SZ04 Storm Grey 2.9 m · SZ10 Blush Pink 1.0 m · SZ06 Soft Black 1.1 m · SZ01 Snow White 30 cm · SZ11 Bubblegum 30 cm · SZ16 Peach 70 cm · SZ12 Rose 90 cmWork order
- Head and body outline (1)
- Nose and smile (5)
- Inner ears (2)
- Big eyes (3)
- Eye highlights (4)
- Blushed cheeks (6)
- Bow on the ear (7)

Symmetrical the way painted furniture is symmetrical: the same cat down both sides of a centre line, a heart set into the chest, a row of knots up the body and a scalloped hem across the feet.
Stitch key
1 Chain stitch · SZ30 Navy · Cat outline work each line left to right, one at a time, each loop holding the last 2 Satin stitch · SZ13 Cherry Red · Inner ears fill each shape with parallel strokes laid side to side 3 Satin stitch · SZ30 Navy · Eyes and nose fill each shape with parallel strokes laid top to bottom 4 Satin stitch · SZ13 Cherry Red · Heart on the chest fill the shape with parallel strokes laid top to bottom 5 French knot · SZ21 Sunflower · Row of knots work the knots last, on the printed spots 6 Back stitch · SZ30 Navy · Scalloped hem work each line left to right, one at a timeYou need
2 strands · embroidery needle size 7 · any hoop or frame that clears the drawing · SZ30 Navy 4.2 m · SZ13 Cherry Red 2.7 m · SZ21 Sunflower 50 cmWork order
- Cat outline (1)
- Scalloped hem (6)
- Inner ears (2)
- Eyes and nose (3)
- Heart on the chest (4)
- Row of knots (5)

One unbroken line that starts at the tip of the tail, runs up the back, over both ears, down the chest and along the floor, and never crosses itself. One thread, one knot to start and one to finish, plus a single stitch for the eye.
Stitch key
1 Back stitch · SZ05 Charcoal · The single line work the line top to bottom 2 Straight stitch · SZ05 Charcoal · One stitch for the eye work the line left to rightYou need
2 strands · embroidery needle size 7 · any hoop or frame that clears the drawing · SZ05 Charcoal 1.5 mWork order
- The single line (1)
- One stitch for the eye (2)

Not one curve anywhere. The head is an eight sided facet, the body a trapezoid, the eyes two diamonds and the tail three straight runs, so the whole thing can be worked by measuring rather than by following a bend.
Stitch key
1 Back stitch · SZ05 Charcoal · Faceted head and body work each outline clockwise, starting at the dot on the map 2 Back stitch · SZ04 Storm Grey · Angular tail work the line bottom to top 3 Straight stitch · SZ13 Cherry Red · Diamond eyes and nose work each outline clockwise, starting at the dot on the map 4 Straight stitch · SZ03 Pearl Grey · Straight whiskers work each line right to left, one at a time 5 Back stitch · SZ05 Charcoal · Front leg lines work each line top to bottom, one at a timeYou need
2 strands · embroidery needle size 7 · any hoop or frame that clears the drawing · SZ05 Charcoal 1.6 m · SZ04 Storm Grey 40 cm · SZ13 Cherry Red 50 cm · SZ03 Pearl Grey 60 cmWork order
- Faceted head and body (1)
- Angular tail (2)
- Diamond eyes and nose (3)
- Straight whiskers (4)
- Front leg lines (5)

Drawn the way a 1900s poster would draw it: the animal held still and severe while the tail does all the work, looping up and over the whole design in one whiplash curve before it comes back down.
Stitch key
1 Split stitch · SZ33 Plum · Stylised body work the outline clockwise, starting at the dot on the map 2 Stem stitch · SZ33 Plum · Whiplash tail work the outline anticlockwise, starting at the dot on the map, thread always on the same side 3 Satin stitch · SZ21 Sunflower · Eye and nose fill each shape with parallel strokes laid top to bottom 4 Satin stitch · SZ27 Teal · Long leaves at the base fill each shape with parallel strokes laid top to bottom 5 French knot · SZ21 Sunflower · Knots along the tail work the knots last, on the printed spotsYou need
2 strands · embroidery needle size 7 · any hoop or frame that clears the drawing · SZ33 Plum 2.3 m · SZ21 Sunflower 90 cm · SZ27 Teal 3.6 mWork order
- Stylised body (1)
- Whiplash tail (2)
- Eye and nose (3)
- Long leaves at the base (4)
- Knots along the tail (5)

The head is not drawn at all. Two ear points, two eyes, a nose and six whiskers are placed where they would be, and the face appears in the gap between them, which is the whole trick and the reason it takes an hour.
Stitch key
1 Back stitch · SZ06 Soft Black · Ear points work each line left to right, one at a time 2 Satin stitch · SZ06 Soft Black · Eyes fill each shape with parallel strokes laid top to bottom 3 Satin stitch · SZ11 Bubblegum · Nose fill the shape with parallel strokes laid top to bottom 4 Straight stitch · SZ06 Soft Black · Whiskers work each line left to right, one at a timeYou need
2 strands · embroidery needle size 7 · any hoop or frame that clears the drawing · SZ06 Soft Black 3.1 m · SZ11 Bubblegum 40 cmWork order
- Ear points (1)
- Whiskers (4)
- Eyes (2)
- Nose (3)
By the stitch each one teaches
Seven cats picked for what each one makes you learn, and drawn for that stitch instead of adapted to it: outline in back stitch with no filling anywhere, shapes cut for satin, a face banded for long and short shading, a white bib packed with French knots, a tail built from six bullion coils, a body woven over five spokes, and a flank seeded for fur.

There is not one filled shape in this drawing. Head, body, ears, eyes, nose, whiskers and tail are all worked as lines in back stitch and stem stitch, so a first piece needs exactly two stitches and neither of them is a filling.
Stitch key
1 Back stitch · SZ05 Charcoal · Head and body work each line left to right, one at a time 2 Back stitch · SZ05 Charcoal · Inner ears work each outline clockwise, starting at the dot on the map 3 Back stitch · SZ05 Charcoal · Eyes, nose and mouth work each outline clockwise, starting at the dot on the map 4 Straight stitch · SZ05 Charcoal · Whiskers work each line left to right, one at a time 5 Stem stitch · SZ05 Charcoal · Tail work the outline anticlockwise, starting at the dot on the map, thread always on the same sideYou need
2 strands · embroidery needle size 7 · any hoop or frame that clears the drawing · SZ05 Charcoal 3.3 mWork order
- Head and body (1)
- Inner ears (2)
- Eyes, nose and mouth (3)
- Whiskers (4)
- Tail (5)

Drawn for filling rather than outlining. Head, body and tail are three separate closed shapes that never share an edge, and none of them is wider than a satin stitch can span in one go without sagging in the middle.
Stitch key
1 Satin stitch · SZ05 Charcoal · Filled head and body fill each shape with parallel strokes laid side to side 2 Satin stitch · SZ05 Charcoal · Filled tail fill the shape with parallel strokes laid top to bottom 3 Satin stitch · SZ10 Blush Pink · Filled inner ears fill each shape with parallel strokes laid side to side 4 Satin stitch · SZ28 Sky Blue · Filled eyes fill each shape with parallel strokes laid top to bottom 5 Satin stitch · SZ11 Bubblegum · Filled nose fill the shape with parallel strokes laid top to bottom 6 Straight stitch · SZ01 Snow White · Whiskers over the filling work each line left to right, one at a timeYou need
2 strands · embroidery needle size 7 · 15 cm hoop · SZ05 Charcoal 26.5 m · SZ10 Blush Pink 1.3 m · SZ28 Sky Blue 60 cm · SZ11 Bubblegum 30 cm · SZ01 Snow White 60 cmWork order
- Whiskers over the filling (6)
- Filled head and body (1)
- Filled tail (2)
- Filled inner ears (3)
- Filled eyes (4)
- Filled nose (5)

A face divided into three bands for shading: darkest across the brow, a mid tone over the cheekbone and the palest round the muzzle, with the tabby M drawn over the top of all three once the shading is dry.
Stitch key
1 Long and short stitch · SZ34 Chocolate · Brow band, darkest fill the shape with parallel strokes laid top to bottom 2 Long and short stitch · SZ35 Toffee · Cheek bands, mid tone fill each shape with parallel strokes laid top to bottom 3 Long and short stitch · SZ36 Sand · Muzzle band, palest fill the shape with parallel strokes laid top to bottom 4 Split stitch · SZ34 Chocolate · Padding outline under the shading work the outline clockwise, starting at the dot on the map 5 Satin stitch · SZ23 Olive · Eyes fill each shape with parallel strokes laid top to bottom 6 Satin stitch · SZ11 Bubblegum · Nose fill the shape with parallel strokes laid top to bottom 7 Back stitch · SZ34 Chocolate · Tabby M over the shading work each line top to bottom, one at a timeYou need
2 strands · embroidery needle size 7 · 15 cm hoop · SZ34 Chocolate 3.5 m · SZ35 Toffee 1.3 m · SZ36 Sand 90 cm · SZ23 Olive 2.3 m · SZ11 Bubblegum 50 cmWork order
- Padding outline under the shading (4)
- Tabby M over the shading (7)
- Brow band, darkest (1)
- Cheek bands, mid tone (2)
- Muzzle band, palest (3)
- Eyes (5)
- Nose (6)

A tuxedo cat whose white parts are not filled but knotted: the chest bib takes about seventy French knots packed in a lattice and each front paw takes nine more, so the white sits proud of the cloth instead of lying flat on it.
Stitch key
1 Stem stitch · SZ06 Soft Black · Head, body and tail outline work each line left to right, one at a time, thread always on the same side 2 French knot · SZ01 Snow White · Knotted chest bib work the knots last, on the printed spots 3 French knot · SZ01 Snow White · Knotted paw tips work the knots last, on the printed spots 4 Satin stitch · SZ39 Fern · Eyes fill each shape with parallel strokes laid top to bottom 5 Satin stitch · SZ11 Bubblegum · Nose fill the shape with parallel strokes laid top to bottom 6 Straight stitch · SZ01 Snow White · Whiskers work each line left to right, one at a timeYou need
2 strands · embroidery needle size 7 · 15 cm hoop · SZ06 Soft Black 2.7 m · SZ01 Snow White 3.8 m · SZ39 Fern 60 cm · SZ11 Bubblegum 30 cmWork order
- Head, body and tail outline (1)
- Whiskers (6)
- Eyes (4)
- Nose (5)
- Knotted chest bib (2)
- Knotted paw tips (3)

The cat is an outline and the tail is not: six separate bullion knots are laid end to end up the curve of it, each one coiled over its own short line, so the tail sits above the cloth and looks like fur from across a room.
Stitch key
1 Stem stitch · SZ35 Toffee · Body and head outline work each outline clockwise, starting at the dot on the map, thread always on the same side 2 Stem stitch · SZ35 Toffee · Legs and paws work each line left to right, one at a time, thread always on the same side 3 Bullion knot · SZ20 Tangerine · Tail, six bullion knots wrap each coil to match its printed length 4 Satin stitch · SZ06 Soft Black · Eye and nose fill each shape with parallel strokes laid side to side 5 Straight stitch · SZ03 Pearl Grey · Whiskers work each line right to left, one at a timeYou need
2 strands · embroidery needle size 7 · any hoop or frame that clears the drawing · SZ35 Toffee 2.4 m · SZ20 Tangerine 1.3 m · SZ06 Soft Black 30 cm · SZ03 Pearl Grey 30 cmWork order
- Body and head outline (1)
- Legs and paws (2)
- Whiskers (5)
- Eye and nose (4)
- Tail, six bullion knots (3)

A curled cat whose entire body is one woven wheel: five straight spokes go down first, then a single thread is woven under and over them from the middle out until the coil fills the ring. The head and tail are stitched round it afterwards.
Stitch key
1 Straight stitch · SZ36 Sand · Five spoke foundation work each line bottom to top, one at a time 2 Woven wheel rose · SZ35 Toffee · Woven body spiral weave over and under the spokes, round and round 3 Stem stitch · SZ35 Toffee · Head and tail work each outline clockwise, starting at the dot on the map, thread always on the same side 4 Satin stitch · SZ16 Peach · Inner ears fill each shape with parallel strokes sloping up to the right 5 Back stitch · SZ34 Chocolate · Closed eyes, nose and mouth work each line left to right, one at a timeYou need
2 strands · embroidery needle size 7 · 13 cm hoop · SZ36 Sand 60 cm · SZ35 Toffee 3.4 m · SZ16 Peach 90 cm · SZ34 Chocolate 30 cmWork order
- Five spoke foundation (1)
- Head and tail (3)
- Closed eyes, nose and mouth (5)
- Inner ears (4)
- Woven body spiral (2)

Fur by scatter rather than by fill: the flank of a standing cat carries about fifty tiny seed stitches, thinning out towards the belly and the legs, which suggests a coat without hiding the outline underneath it.
Stitch key
1 Split stitch · SZ45 Slate · Body and head outline work each outline clockwise, starting at the dot on the map 2 Split stitch · SZ45 Slate · Legs, paws and tail work each line left to right, one at a time 3 Seed stitch · SZ42 Silver Blue · Seeded fur on the flank scatter the little stitches at changing angles 4 Satin stitch · SZ21 Sunflower · Eye and nose fill each shape with parallel strokes laid side to side 5 Straight stitch · SZ03 Pearl Grey · Whiskers work each line right to left, one at a timeYou need
2 strands · embroidery needle size 7 · any hoop or frame that clears the drawing · SZ45 Slate 3.0 m · SZ42 Silver Blue 1.4 m · SZ21 Sunflower 40 cm · SZ03 Pearl Grey 40 cmWork order
- Body and head outline (1)
- Legs, paws and tail (2)
- Whiskers (5)
- Eye and nose (4)
- Seeded fur on the flank (3)
By finished size
Six pieces measured for the six things they go on, because scale is decided before any stitch is: thirty two millimetres for a shirt pocket corner, a mirrored pair for two collar points, a band shallow enough to sit between the rows of stitching on a cuff, one composition for a ten centimetre hoop and another for a fifteen, and a face fourteen centimetres wide for a tote.

Thirty two millimetres across, which is about as small as a cat face goes before the nose and the mouth run into each other. Head, ears, eyes, nose and four short whiskers, all in back stitch, in one strand rather than two.
Stitch key
1 Back stitch · SZ05 Charcoal · Head work the outline clockwise, starting at the dot on the map 2 Back stitch · SZ05 Charcoal · Eyes, nose and mouth work each outline clockwise, starting at the dot on the map 3 Straight stitch · SZ05 Charcoal · Whiskers work each line left to right, one at a timeYou need
1 strand · embroidery needle size 9 · any hoop or frame that clears the drawing · SZ05 Charcoal 1.1 mWork order
- Head (1)
- Eyes, nose and mouth (2)
- Whiskers (3)

Two cats that mirror each other, one for each collar point, printed the right distance apart so you can fold the sheet down the middle and check the pair before tracing either half. Each one is under five centimetres tall.
Stitch key
1 Chain stitch · SZ05 Charcoal · Cat outlines work each outline clockwise, starting at the dot on the map, each loop holding the last 2 Chain stitch · SZ05 Charcoal · Tails work each outline anticlockwise, starting at the dot on the map, each loop holding the last 3 Back stitch · SZ13 Cherry Red · Collars work each line left to right, one at a time 4 Satin stitch · SZ06 Soft Black · Eyes fill each shape with parallel strokes laid top to bottomYou need
2 strands · embroidery needle size 7 · any hoop or frame that clears the drawing · SZ05 Charcoal 2.8 m · SZ13 Cherry Red 40 cm · SZ06 Soft Black 30 cmWork order
- Cat outlines (1)
- Tails (2)
- Collars (3)
- Eyes (4)

A band twenty six millimetres deep, which is what fits between the two rows of stitching on a shirt cuff, with four cats walking in single file along a straight rail. Half a metre of it is an evening.
Stitch key
1 Stem stitch · SZ04 Storm Grey · Straight rail work the line left to right, thread always on the same side 2 Back stitch · SZ05 Charcoal · Cat outlines work each outline clockwise, starting at the dot on the map 3 Back stitch · SZ05 Charcoal · Legs, paws and tails work each line left to right, one at a timeYou need
2 strands · embroidery needle size 7 · any hoop or frame that clears the drawing · SZ04 Storm Grey 70 cm · SZ05 Charcoal 2.9 mWork order
- Straight rail (1)
- Cat outlines (2)
- Legs, paws and tails (3)

Sized so the drawing stops nine millimetres inside the ring of a ten centimetre hoop, which is the gap the fabric needs to be gripped without the paw prints disappearing under the rim. One cat and two prints, nothing else.
Stitch key
1 Chain stitch · SZ04 Storm Grey · Cat outline work each line left to right, one at a time, each loop holding the last 2 Satin stitch · SZ10 Blush Pink · Inner ears fill each shape with parallel strokes laid side to side 3 Satin stitch · SZ06 Soft Black · Eyes and nose fill each shape with parallel strokes laid top to bottom 4 Straight stitch · SZ03 Pearl Grey · Whiskers work each line left to right, one at a time 5 Back stitch · SZ36 Sand · Paw prints beside it work each outline clockwise, starting at the dot on the mapYou need
2 strands · embroidery needle size 7 · 10 cm hoop · SZ04 Storm Grey 2.0 m · SZ10 Blush Pink 60 cm · SZ06 Soft Black 40 cm · SZ03 Pearl Grey 40 cm · SZ36 Sand 70 cmWork order
- Cat outline (1)
- Whiskers (4)
- Paw prints beside it (5)
- Inner ears (2)
- Eyes and nose (3)

The big one: a cat asleep in a ring at the middle, a ball of wool dropped beside it and three prints crossing the space above, drawn to reach the edge of a fifteen centimetre hoop. Roughly an evening and a half of stitching.
Stitch key
1 Stem stitch · SZ35 Toffee · Sleeping cat work each outline clockwise, starting at the dot on the map, thread always on the same side 2 Satin stitch · SZ16 Peach · Inner ears fill each shape with parallel strokes sloping up to the right 3 Back stitch · SZ34 Chocolate · Closed eyes, nose and mouth work each line left to right, one at a time 4 Chain stitch · SZ12 Rose · Ball of wool work each outline clockwise, starting at the dot on the map, each loop holding the last 5 Whipped back stitch · SZ12 Rose · Loose thread work the line left to right, then whip back over it 6 Satin stitch · SZ36 Sand · Paw prints above fill each shape with parallel strokes laid side to sideYou need
2 strands · embroidery needle size 7 · 15 cm hoop · SZ35 Toffee 1.7 m · SZ16 Peach 50 cm · SZ34 Chocolate 30 cm · SZ12 Rose 1.4 m · SZ36 Sand 2.0 mWork order
- Sleeping cat (1)
- Closed eyes, nose and mouth (3)
- Ball of wool (4)
- Loose thread (5)
- Inner ears (2)
- Paw prints above (6)

Deliberately oversized and deliberately blunt: one face fourteen centimetres across, with every line drawn heavy enough to survive on canvas and to read from the other side of a room. Six whiskers, and no small detail anywhere.
Stitch key
1 Couching · SZ06 Soft Black · Head outline, laid thread lay the long thread round, then tie it down with tiny crosses 2 Satin stitch · SZ12 Rose · Inner ears fill each shape with parallel strokes laid side to side 3 Satin stitch · SZ22 Butter · Eyes fill each shape with parallel strokes laid top to bottom 4 Satin stitch · SZ06 Soft Black · Pupils fill each shape with parallel strokes laid side to side 5 Chain stitch · SZ12 Rose · Nose and mouth work each outline clockwise, starting at the dot on the map, each loop holding the last 6 Couching · SZ06 Soft Black · Whiskers, laid thread lay the long threads first, then tie them down with tiny crossesYou need
2 strands · embroidery needle size 7 · any hoop or frame that clears the drawing · SZ06 Soft Black 2.4 m · SZ12 Rose 5.9 m · SZ22 Butter 2.2 mWork order
- Nose and mouth (5)
- Inner ears (2)
- Eyes (3)
- Pupils (4)
- Head outline, laid thread (1)
- Whiskers, laid thread (6)
How to read one of these transfers
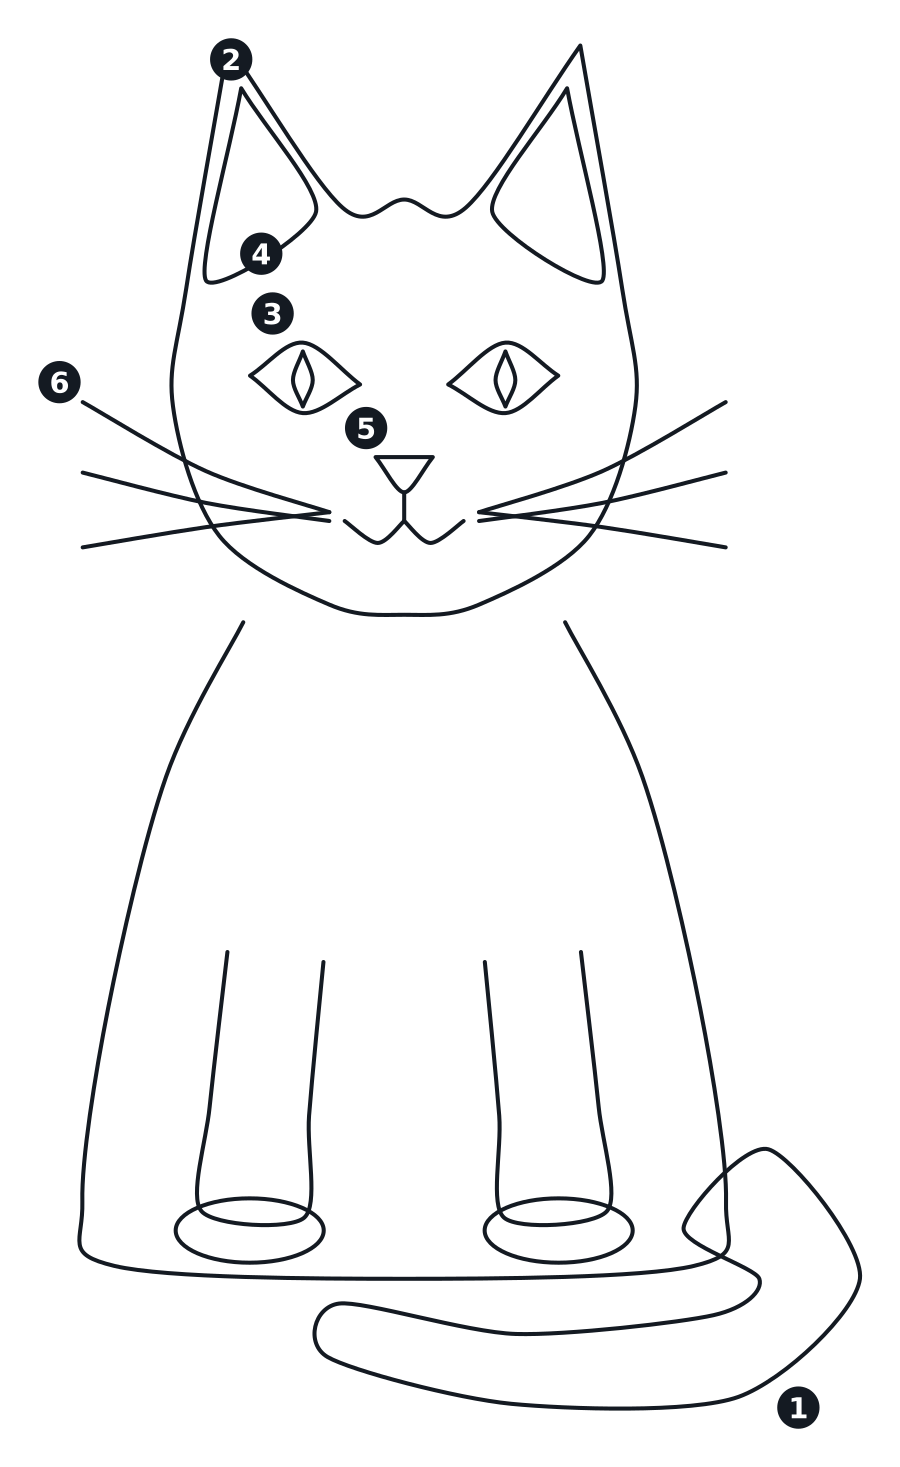
- The drawing is a transfer, not a chart. Print it at 100 per cent and it comes out at the finished size printed on the card.
- Every numbered circle points at one line of the drawing. The stitch key gives that number a stitch, a thread code and a colour.
- A closed shape in the key marked satin stitch is meant to be filled solid. Everything else is worked along the line itself.
- Trace it with a water soluble pen against a window or a lightbox, or tack tissue paper over the fabric and tear it away afterwards.
Stitches on this page
Every cat on this page is worked from the fourteen stitches below, and half of the designs never leave the first three. The diagrams number each needle move; under each one is the cat that leans hardest on that stitch, because an ear worked on a real pattern teaches faster than a sampler square.
Back stitch
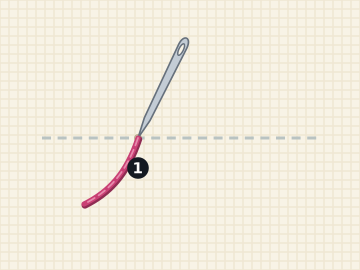
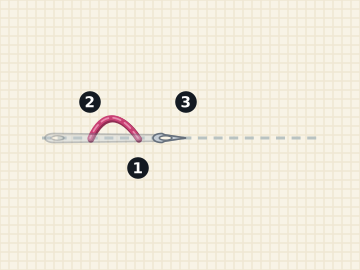
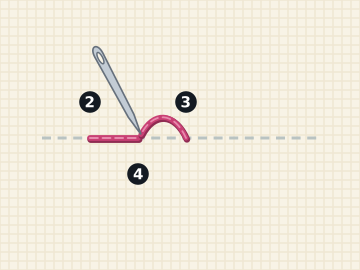
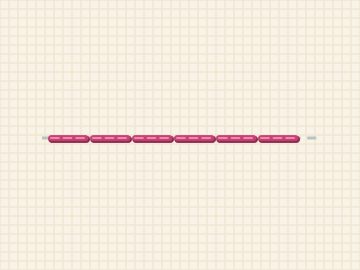
The Outline Cat for Beginners is back stitch with nothing else, and the One Line Cat is a single back stitched path.
Straight stitch
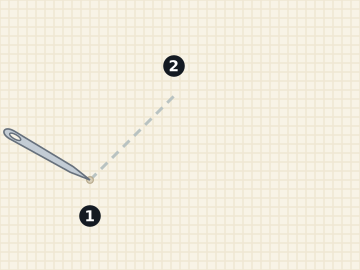
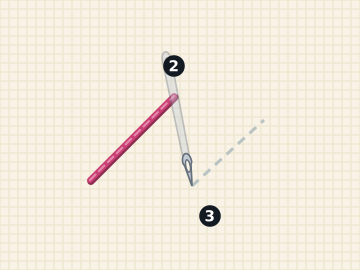
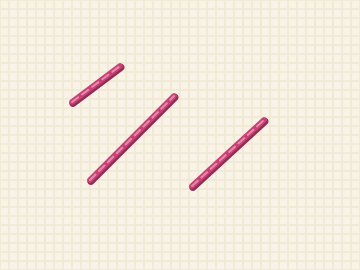
Whiskers, all over this page, are straight stitch: three per cheek on the Satin Stitch Cat alone.
Stem stitch
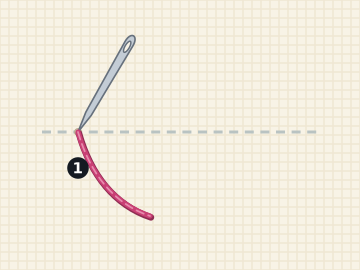
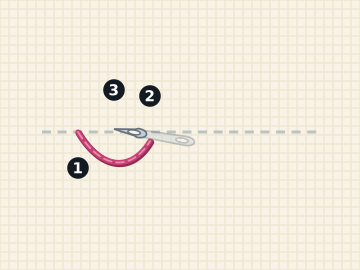
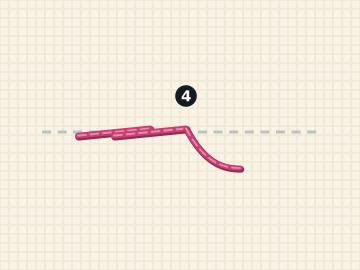
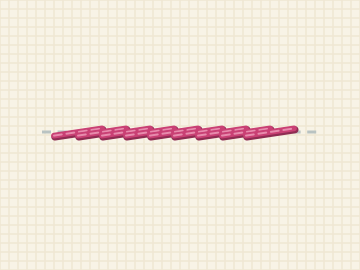
The Sleeping Cat curls its whole body in stem stitch, and the Cat Loaf uses it for that long unbroken back.
Split stitch
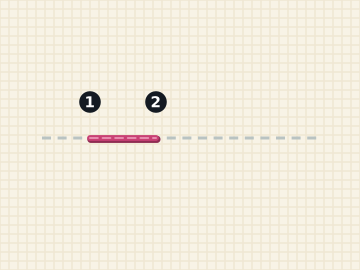
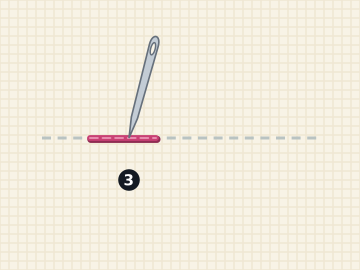
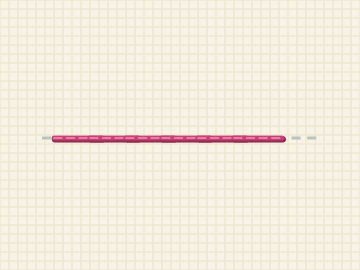
The Seed Stitch Cat draws its outline in split stitch, and the Art Nouveau Cat depends on its fine line.
Chain stitch
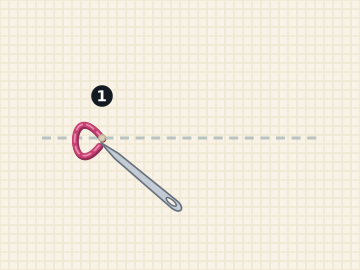
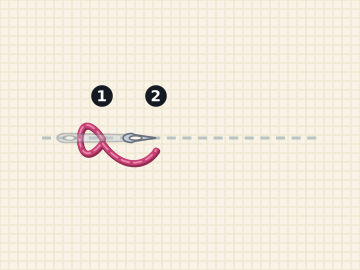
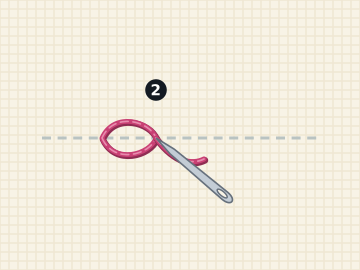
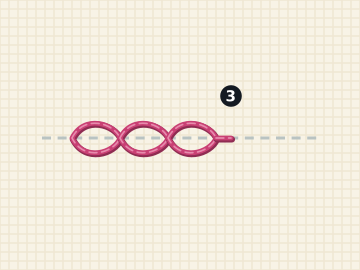
The Sitting Cat outlines body and tail in chain, and the Kawaii Cat is chained the whole way round.
Whipped back stitch
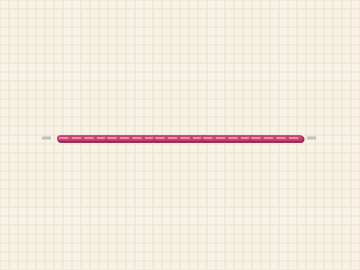
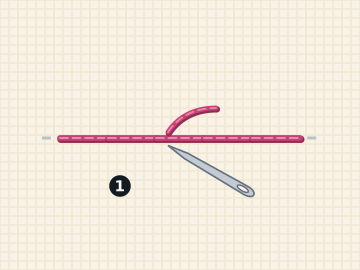
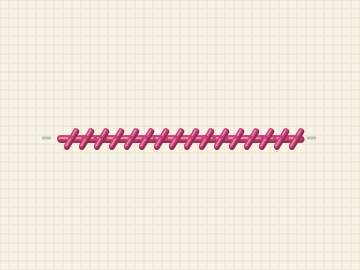
The Cat With a Ball of Yarn whips its trailing thread, which is exactly what a strand of wool looks like.
Fly stitch
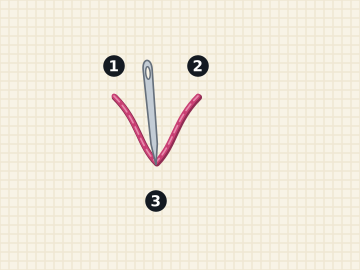
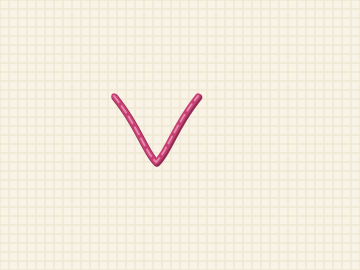
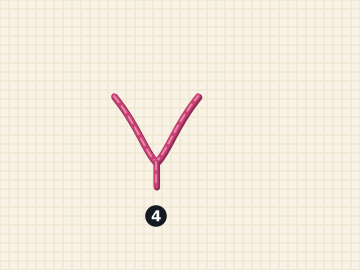
The Cat From Behind closes each ear with one fly stitch, a soft V tied down at its point.
Satin stitch
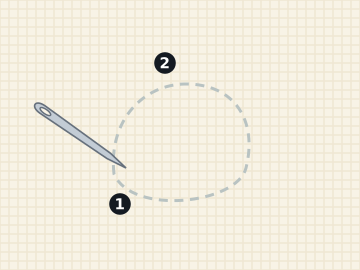
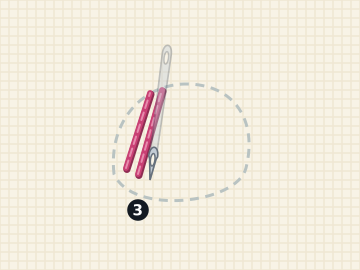
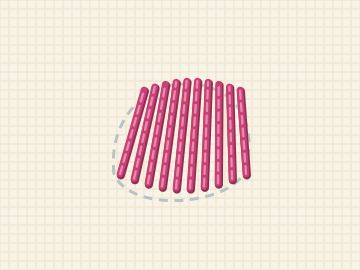
The Satin Stitch Cat is cut into shapes for this fill, and the Cat Silhouette is one satin cat.
Long and short stitch
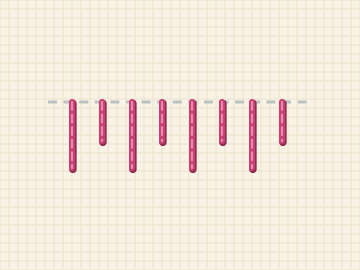
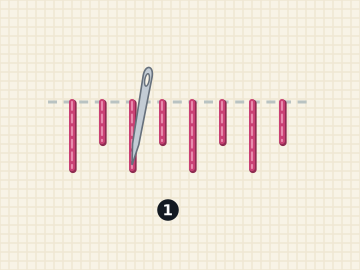
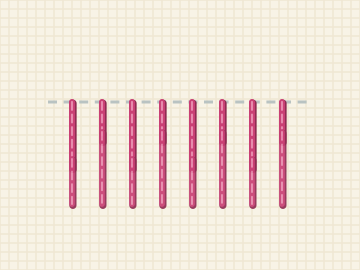
The Shaded Tabby blends grey into cream with long and short rows, stripe by stripe.
French knot
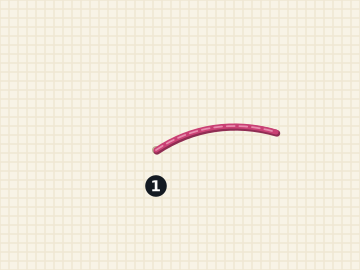
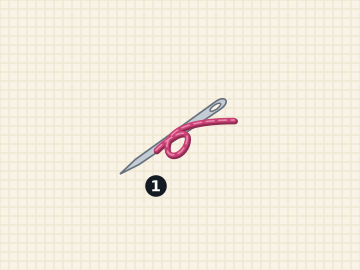
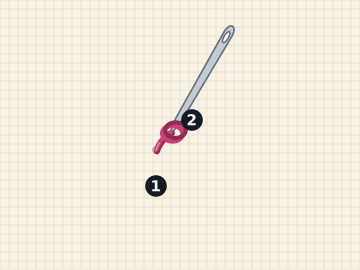
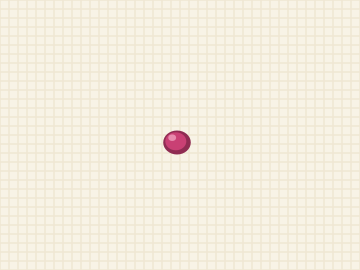
The French Knot Cat fills its white bib with knots packed shoulder to shoulder.
Seed stitch
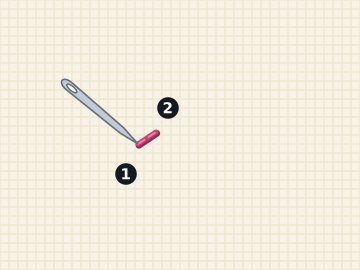
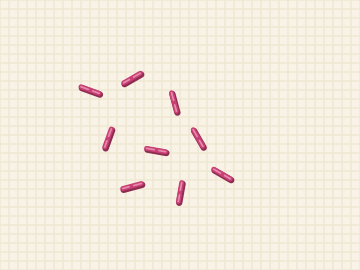
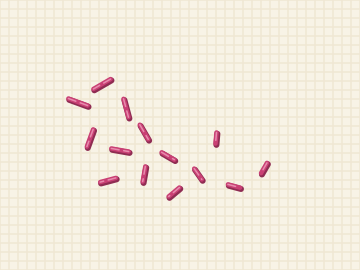
The Seed Stitch Cat furs its flank with scattered seeds, and the Paw Print softens its pads the same way.
Couching
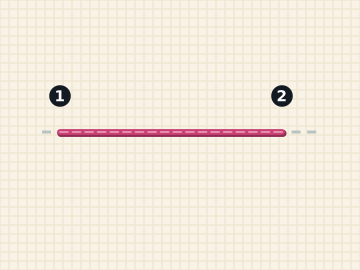
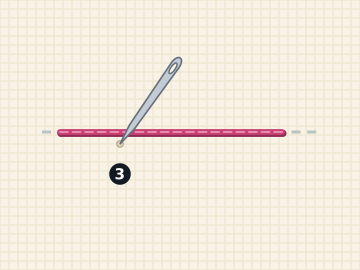
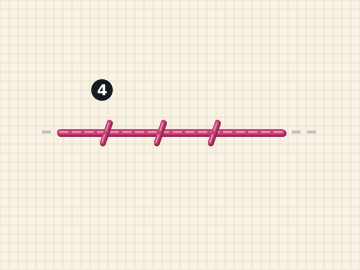
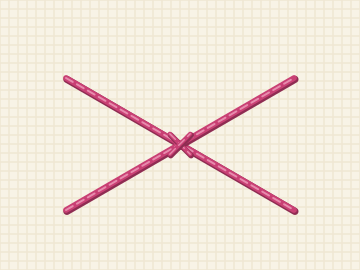
The Cat Tote Bag Panel couches its heavy outline, and the Peeking Cat couches the pocket edge its paws hang over.
Bullion knot
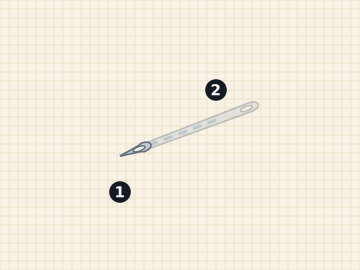
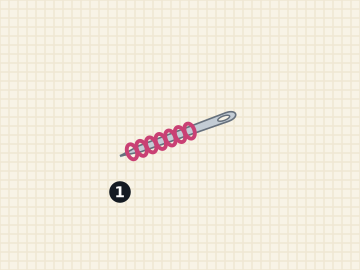
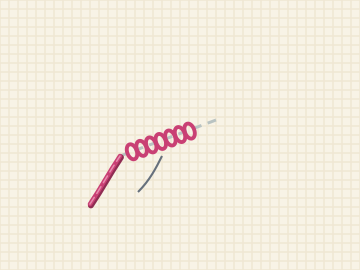
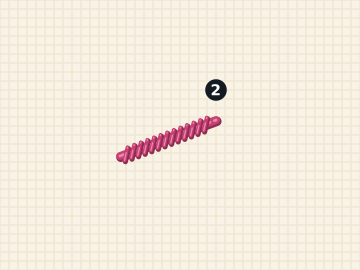
The Bullion Knot Cat builds its tail from six of these coils laid nose to tail.
Woven wheel rose
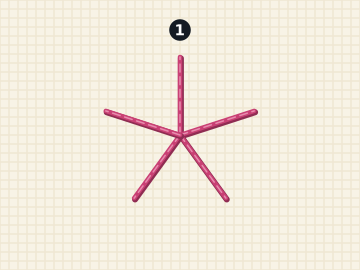
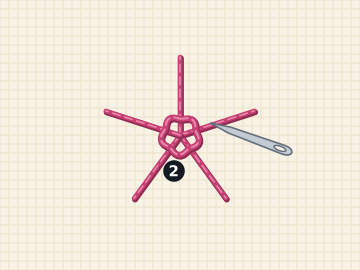
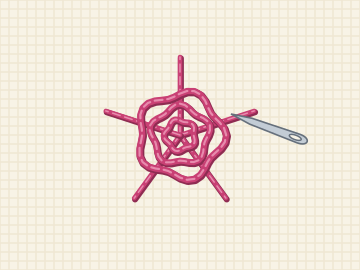
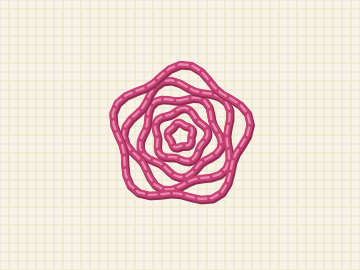
The Woven Wheel Cat wears one woven rose as its round body, spokes printed on the sheet.
What is on this page
These are surface embroidery transfers, not counted charts. Each one is a line drawing you print, trace onto fabric and then stitch along freehand, with a numbered circle on every line and a key that turns each number into a stitch, one of our thread codes and a plain colour name. There is no aida cloth and nothing to count.
There are 31 cats here in five groups. Pose and subject are about what you are making, style is about how it is drawn, technique is about what it will teach you, and size is about where it is going. Finished sizes run from 32 millimetres across to 15 centimetres, so the smallest fits in a pocket corner and the largest fills a hoop.
Why a cat is harder to draw than a flower
Nobody knows what any individual rose looks like, so a rose is forgiving. Everybody knows what a cat looks like, and a wrong ear reads as a fox instantly. Three things carry it, and every drawing on this page is built round them. The ears are tall triangles with sharp tips, leaning outward, about half the height of the skull again: round them off and you have a bear. The face is widest at the cheeks, below the eyes, and narrows to a small chin, so a circle with ears on it is a teddy and not a cat. And the tail has real thickness along its whole length, because a tail drawn as a single hairline reads as a piece of string somebody left on the fabric.
How to get the drawing onto the fabric
Print at 100 per cent, never fit to page, or the finished size on the card stops being true. Tape the sheet to a bright window, tape your fabric over it and trace with a water soluble pen or a sharp pencil. At night a tablet with a white screen does the same job. On dark or thick cloth, tack tissue paper over the fabric, stitch through both and tear the tissue away at the end.
Two strands of six strand cotton is the default here unless the pattern says otherwise, and the small designs are better in one. Work roughly in number order: outlines first, then anything marked satin or long and short, then the knots last, so nothing you have raised gets flattened under the side of your hand.
Faces, whiskers and the order to stitch them
A cat face is four decisions and they are easier in this order. Outline the head first, including both ears, because everything else is positioned against it. Then the eyes, which sit slightly below the halfway line of the skull and about one eye width apart. Then the nose, a small rounded triangle, and the two curves of the muzzle under it. Whiskers go on last, always, and always over the top of whatever is already there: they are the only lines on the drawing that are meant to cross another line, and stitching them early means working round them for the rest of the evening. Two strands for everything except the whiskers, which look better in one.
Threads, hoops and finished size
Every pattern lists its threads with our own codes and plain colour names, so you can match them to whatever brand is already in your box rather than buying a specific catalogue number. Nothing here needs a full skein. The finished size printed on each card is measured off the drawing itself and the sheet is scaled to it, so a pattern that says nine centimetres across really is nine centimetres on paper. Where a design was drawn for a hoop, the sheet prints that hoop as a dashed circle so you can centre the fabric before the first stitch goes in.
Every design here is our own
Not one of these drawings is traced, scanned, bought or lifted from another designer's transfer, and none of them is a licensed character or a cartoon you would recognise. They are built out of curves written by hand in code, which is why they can be free. The license page sets out what you may do with them, including selling the pieces you stitch. The rose embroidery patterns and sunflower embroidery patterns pages are the flower half of this craft and use the same numbered key, the cross stitch patterns page is the counted side of the site, and the Pattern Maker will chart a picture of your own onto a grid in a few seconds.
How to use these embroidery transfers
- Print the PDF at 100 per cent. The drawing is actual size, so it fits the hoop the pattern names without any scaling.
- Trace the lines onto your fabric, then put it in the hoop drum tight. Two strands of stranded cotton is the default here unless the pattern says otherwise.
- Work the numbers in order: outlines first, filled shapes next, knots last, so nothing already stitched gets flattened under your hand.