
Butterfly embroidery patterns
Thirty one butterfly transfers, free at actual size, each with its numbered stitch key. Pick by wing shape, arrangement, style, stitch or destination.
31 free patterns ·
Drawn and checked by  Ivy Skein
Which butterfly embroidery pattern should a beginner choose?
Start with the outline-only butterfly or the tiny pocket design. Both use only back stitch, stem stitch and split stitch, with every wing left open and nothing to fill. Trace the body first, then work one mirrored pair of wings at a time so the two sides stay balanced.
The easiest pattern on this page is Tiny Pocket Butterfly Embroidery Pattern. Learn its stitches step by step further down.
By wing shape
Six silhouettes before any decorative style is added: a broad round meadow butterfly, a swallowtail with two real hindwing tails, a longwing built for gliding, an angular woodland profile with held corners, a compact small-blue shape and a low wide night form that leans towards a moth. The outline changes in every design, not just the markings inside it.

Broad forewings and compact hindwings make a calm meadow silhouette, with three oval spots kept well inside each edge so they stay readable after the outline is worked.
Stitch key
1 Stem stitch · SZ12 Rose · Four wing shapes work each outline clockwise, starting at the dot on the map, thread always on the same side 2 Back stitch · SZ06 Soft Black · Body and head work each outline anticlockwise, starting at the dot on the map 3 Stem stitch · SZ06 Soft Black · Antennae work each line bottom to top, one at a time, thread always on the same side 4 Split stitch · SZ34 Chocolate · Wing veins work each line left to right, one at a time 5 Back stitch · SZ16 Peach · Wing spots work each outline clockwise, starting at the dot on the mapYou need
2 strands · embroidery needle size 7 · 10 cm hoop · SZ12 Rose 1.4 m · SZ06 Soft Black 70 cm · SZ34 Chocolate 80 cm · SZ16 Peach 50 cmWork order
- Four wing shapes (1)
- Body and head (2)
- Antennae (3)
- Wing veins (4)
- Wing spots (5)

Two unmistakable tails extend below the hindwings while the forewings rise in clean points. The veins stop before the tips, leaving room for the tails to carry the whole outline.
Stitch key
1 Stem stitch · SZ12 Rose · Four wing shapes work each outline clockwise, starting at the dot on the map, thread always on the same side 2 Back stitch · SZ06 Soft Black · Body and head work each outline anticlockwise, starting at the dot on the map 3 Stem stitch · SZ06 Soft Black · Antennae work each line bottom to top, one at a time, thread always on the same side 4 Split stitch · SZ34 Chocolate · Wing veins work each line left to right, one at a time 5 Back stitch · SZ16 Peach · Wing spots work each outline clockwise, starting at the dot on the mapYou need
2 strands · embroidery needle size 7 · 10 cm hoop · SZ12 Rose 1.6 m · SZ06 Soft Black 70 cm · SZ34 Chocolate 70 cm · SZ16 Peach 50 cmWork order
- Four wing shapes (1)
- Body and head (2)
- Antennae (3)
- Wing veins (4)
- Wing spots (5)

The upper wings stretch almost twice as far as the lower pair, giving this butterfly a fast gliding profile. Narrow spots follow that length instead of cutting across it.
Stitch key
1 Stem stitch · SZ12 Rose · Four wing shapes work each outline clockwise, starting at the dot on the map, thread always on the same side 2 Back stitch · SZ06 Soft Black · Body and head work each outline anticlockwise, starting at the dot on the map 3 Stem stitch · SZ06 Soft Black · Antennae work each line up towards the left, one at a time, thread always on the same side 4 Split stitch · SZ34 Chocolate · Wing veins work each line left to right, one at a time 5 Back stitch · SZ16 Peach · Wing spots work each outline clockwise, starting at the dot on the mapYou need
2 strands · embroidery needle size 7 · 10 cm hoop · SZ12 Rose 1.5 m · SZ06 Soft Black 70 cm · SZ34 Chocolate 80 cm · SZ16 Peach 60 cmWork order
- Four wing shapes (1)
- Body and head (2)
- Antennae (3)
- Wing veins (4)
- Wing spots (5)

Corners are held sharp instead of smoothed, so the four wings read as folded paper or a woodland anglewing. Every facet remains a stitchable run rather than a decorative notch.
Stitch key
1 Stem stitch · SZ12 Rose · Four wing shapes work each outline clockwise, starting at the dot on the map, thread always on the same side 2 Back stitch · SZ06 Soft Black · Body and head work each outline anticlockwise, starting at the dot on the map 3 Stem stitch · SZ06 Soft Black · Antennae work each line bottom to top, one at a time, thread always on the same side 4 Split stitch · SZ34 Chocolate · Wing veins work each line left to right, one at a time 5 Back stitch · SZ16 Peach · Wing spots work each outline clockwise, starting at the dot on the mapYou need
2 strands · embroidery needle size 7 · 10 cm hoop · SZ12 Rose 1.5 m · SZ06 Soft Black 80 cm · SZ34 Chocolate 80 cm · SZ16 Peach 60 cmWork order
- Four wing shapes (1)
- Body and head (2)
- Antennae (3)
- Wing veins (4)
- Wing spots (5)

A compact round-wing profile drawn for blue thread, with the hindwings reduced and the markings kept as paired dots. It stays recognisable at four centimetres.
Stitch key
1 Stem stitch · SZ12 Rose · Four wing shapes work each outline clockwise, starting at the dot on the map, thread always on the same side 2 Back stitch · SZ06 Soft Black · Body and head work each outline anticlockwise, starting at the dot on the map 3 Stem stitch · SZ06 Soft Black · Antennae work each line up towards the left, one at a time, thread always on the same side 4 Back stitch · SZ16 Peach · Wing spots work each outline clockwise, starting at the dot on the mapYou need
2 strands · embroidery needle size 7 · 10 cm hoop · SZ12 Rose 1.4 m · SZ06 Soft Black 70 cm · SZ16 Peach 60 cmWork order
- Four wing shapes (1)
- Body and head (2)
- Antennae (3)
- Wing spots (4)

A heavier body and wings held nearly level push the drawing towards a night moth without adding fur or antenna clutter. Two large eye spots become the focus.
Stitch key
1 Stem stitch · SZ12 Rose · Four wing shapes work each outline clockwise, starting at the dot on the map, thread always on the same side 2 Back stitch · SZ06 Soft Black · Body and head work each outline anticlockwise, starting at the dot on the map 3 Stem stitch · SZ06 Soft Black · Antennae work each line up towards the left, one at a time, thread always on the same side 4 Split stitch · SZ34 Chocolate · Wing veins work each line left to right, one at a time 5 Back stitch · SZ16 Peach · Wing spots work each outline clockwise, starting at the dot on the mapYou need
2 strands · embroidery needle size 7 · 10 cm hoop · SZ12 Rose 1.6 m · SZ06 Soft Black 80 cm · SZ34 Chocolate 90 cm · SZ16 Peach 50 cmWork order
- Four wing shapes (1)
- Body and head (2)
- Antennae (3)
- Wing veins (4)
- Wing spots (5)
By arrangement
Six ways to place the subject on cloth: one butterfly opened flat, a measured matching pair with a blank for initials, three climbing on a diagonal flight trail, five around an empty wreath centre, an L-shaped group for a pocket or napkin corner, and a shallow five-butterfly repeat with a rail that can continue along a hem.

One butterfly, square to the cloth and fully open, with nothing competing around it. This is the neutral arrangement for a patch, a first hoop or a motif beside lettering.
Stitch key
1 Stem stitch · SZ12 Rose · Four wing shapes work each outline clockwise, starting at the dot on the map, thread always on the same side 2 Back stitch · SZ06 Soft Black · Body and head work each outline anticlockwise, starting at the dot on the map 3 Stem stitch · SZ06 Soft Black · Antennae work each line bottom to top, one at a time, thread always on the same side 4 Split stitch · SZ34 Chocolate · Wing veins work each line left to right, one at a time 5 Back stitch · SZ16 Peach · Wing spots work each outline clockwise, starting at the dot on the mapYou need
2 strands · embroidery needle size 7 · any hoop or frame that clears the drawing · SZ12 Rose 1.4 m · SZ06 Soft Black 70 cm · SZ34 Chocolate 80 cm · SZ16 Peach 50 cmWork order
- Four wing shapes (1)
- Body and head (2)
- Antennae (3)
- Wing veins (4)
- Wing spots (5)

Two matching butterflies sit without touching, leaving a deliberate blank between the antennae for initials or a tiny flower. Their wing tips end on the same baseline.
Stitch key
1 Stem stitch · SZ12 Rose · Four wing shapes work each outline clockwise, starting at the dot on the map, thread always on the same side 2 Back stitch · SZ06 Soft Black · Body and head work each outline anticlockwise, starting at the dot on the map 3 Stem stitch · SZ06 Soft Black · Antennae work each line bottom to top, one at a time, thread always on the same side 4 Split stitch · SZ34 Chocolate · Wing veins work each line up towards the right, one at a time 5 Back stitch · SZ16 Peach · Wing spots work each outline clockwise, starting at the dot on the mapYou need
2 strands · embroidery needle size 7 · any hoop or frame that clears the drawing · SZ12 Rose 2.1 m · SZ06 Soft Black 1.0 m · SZ34 Chocolate 90 cm · SZ16 Peach 70 cmWork order
- Four wing shapes (1)
- Body and head (2)
- Antennae (3)
- Wing veins (4)
- Wing spots (5)

Three butterflies climb from lower left to upper right, shrinking as they go. The changing outline and widening gap create movement without printed motion lines.
Stitch key
1 Stem stitch · SZ12 Rose · Four wing shapes work each outline clockwise, starting at the dot on the map, thread always on the same side 2 Back stitch · SZ06 Soft Black · Body and head work each outline anticlockwise, starting at the dot on the map 3 Stem stitch · SZ06 Soft Black · Antennae work each line bottom to top, one at a time, thread always on the same side 4 Split stitch · SZ34 Chocolate · Wing veins work each line left to right, one at a time 5 Back stitch · SZ16 Peach · Wing spots work each outline clockwise, starting at the dot on the mapYou need
2 strands · embroidery needle size 7 · any hoop or frame that clears the drawing · SZ12 Rose 1.6 m · SZ06 Soft Black 90 cm · SZ34 Chocolate 90 cm · SZ16 Peach 60 cmWork order
- Four wing shapes (1)
- Body and head (2)
- Antennae (3)
- Wing veins (4)
- Wing spots (5)

Five butterflies turn around an open middle, each one angled along the circle rather than standing upright. The empty centre is wide enough for a name or date.
Stitch key
1 Stem stitch · SZ12 Rose · Four wing shapes work each outline clockwise, starting at the dot on the map, thread always on the same side 2 Back stitch · SZ06 Soft Black · Body and head work each outline anticlockwise, starting at the dot on the map 3 Stem stitch · SZ06 Soft Black · Antennae work each line bottom to top, one at a time, thread always on the same side 4 Split stitch · SZ34 Chocolate · Wing veins work each line left to right, one at a time 5 Back stitch · SZ16 Peach · Wing spots work each outline clockwise, starting at the dot on the mapYou need
2 strands · embroidery needle size 7 · any hoop or frame that clears the drawing · SZ12 Rose 2.1 m · SZ06 Soft Black 1.1 m · SZ34 Chocolate 1.1 m · SZ16 Peach 70 cmWork order
- Four wing shapes (1)
- Body and head (2)
- Antennae (3)
- Wing veins (4)
- Wing spots (5)

Three butterflies occupy an L rather than a square: one sits above the corner, one beside it and one turns through the bend. The cloth edge supplies the missing frame.
Stitch key
1 Stem stitch · SZ12 Rose · Four wing shapes work each outline clockwise, starting at the dot on the map, thread always on the same side 2 Back stitch · SZ06 Soft Black · Body and head work each outline anticlockwise, starting at the dot on the map 3 Stem stitch · SZ06 Soft Black · Antennae work each line bottom to top, one at a time, thread always on the same side 4 Split stitch · SZ34 Chocolate · Wing veins work each line left to right, one at a time 5 Back stitch · SZ16 Peach · Wing spots work each outline clockwise, starting at the dot on the mapYou need
2 strands · embroidery needle size 7 · any hoop or frame that clears the drawing · SZ12 Rose 1.6 m · SZ06 Soft Black 90 cm · SZ34 Chocolate 1.1 m · SZ16 Peach 60 cmWork order
- Four wing shapes (1)
- Body and head (2)
- Antennae (3)
- Wing veins (4)
- Wing spots (5)

Five small butterflies alternate high and low across a shallow band. A straight guide rail marks the hem, so the repeat can continue beyond the printed unit without drifting.
Stitch key
1 Stem stitch · SZ12 Rose · Four wing shapes work each outline clockwise, starting at the dot on the map, thread always on the same side 2 Back stitch · SZ06 Soft Black · Body and head work each outline anticlockwise, starting at the dot on the map 3 Stem stitch · SZ06 Soft Black · Antennae work each line bottom to top, one at a time, thread always on the same side 4 Split stitch · SZ34 Chocolate · Wing veins work each line left to right, one at a time 5 Back stitch · SZ16 Peach · Wing spots work each outline clockwise, starting at the dot on the mapYou need
2 strands · embroidery needle size 7 · any hoop or frame that clears the drawing · SZ12 Rose 3.0 m · SZ06 Soft Black 1.5 m · SZ34 Chocolate 1.5 m · SZ16 Peach 80 cmWork order
- Four wing shapes (1)
- Body and head (2)
- Antennae (3)
- Wing veins (4)
- Wing spots (5)
By drawing style
Six drawing grammars rather than six labels on one outline: a minimal butterfly with empty wings, a faceted geometric one, a folk motif with a heart at its centre, a botanical study carrying full venation, a kawaii version whose wing-to-body proportion makes it cute, and an art nouveau profile with long tails and extra flowing antenna curves.

The markings and veins are removed, leaving four wing outlines, one narrow body and two antennae. The blank interior is intentional and keeps the piece light on sheer fabric.
Stitch key
1 Stem stitch · SZ12 Rose · Four wing shapes work each outline clockwise, starting at the dot on the map, thread always on the same side 2 Back stitch · SZ06 Soft Black · Body and head work each outline anticlockwise, starting at the dot on the map 3 Stem stitch · SZ06 Soft Black · Antennae work each line bottom to top, one at a time, thread always on the same sideYou need
2 strands · embroidery needle size 7 · 10 cm hoop · SZ12 Rose 1.4 m · SZ06 Soft Black 70 cmWork order
- Four wing shapes (1)
- Body and head (2)
- Antennae (3)

The angular profile and four mirrored divisions make the butterfly read like cut paper. Curves survive only at the body, so the wings can be measured as short clean runs.
Stitch key
1 Stem stitch · SZ12 Rose · Four wing shapes work each outline clockwise, starting at the dot on the map, thread always on the same side 2 Back stitch · SZ06 Soft Black · Body and head work each outline anticlockwise, starting at the dot on the map 3 Stem stitch · SZ06 Soft Black · Antennae work each line bottom to top, one at a time, thread always on the same side 4 Split stitch · SZ34 Chocolate · Wing veins work each line left to right, one at a time 5 Back stitch · SZ16 Peach · Wing spots work each outline clockwise, starting at the dot on the mapYou need
2 strands · embroidery needle size 7 · 10 cm hoop · SZ12 Rose 1.6 m · SZ06 Soft Black 80 cm · SZ34 Chocolate 80 cm · SZ16 Peach 60 cmWork order
- Four wing shapes (1)
- Body and head (2)
- Antennae (3)
- Wing veins (4)
- Wing spots (5)

Large dots, a stout body and exact bilateral symmetry give this the painted-furniture register of folk art. There is no naturalistic shading and no tiny vein work.
Stitch key
1 Stem stitch · SZ12 Rose · Four wing shapes work each outline clockwise, starting at the dot on the map, thread always on the same side 2 Back stitch · SZ06 Soft Black · Body and head work each outline anticlockwise, starting at the dot on the map 3 Stem stitch · SZ06 Soft Black · Antennae work each line up towards the left, one at a time, thread always on the same side 4 Split stitch · SZ34 Chocolate · Wing veins work the outline anticlockwise, starting at the dot on the map 5 Back stitch · SZ16 Peach · Wing spots work each outline clockwise, starting at the dot on the mapYou need
2 strands · embroidery needle size 7 · 10 cm hoop · SZ12 Rose 1.6 m · SZ06 Soft Black 80 cm · SZ34 Chocolate 50 cm · SZ16 Peach 60 cmWork order
- Four wing shapes (1)
- Body and head (2)
- Antennae (3)
- Wing veins (4)
- Wing spots (5)

The study version keeps all eight main veins, separates head, thorax and abdomen, and holds the spots back from the edges. It reads as observation rather than decoration.
Stitch key
1 Stem stitch · SZ12 Rose · Four wing shapes work each outline clockwise, starting at the dot on the map, thread always on the same side 2 Back stitch · SZ06 Soft Black · Body and head work each outline anticlockwise, starting at the dot on the map 3 Stem stitch · SZ06 Soft Black · Antennae work each line bottom to top, one at a time, thread always on the same side 4 Split stitch · SZ34 Chocolate · Wing veins work each line left to right, one at a time 5 Back stitch · SZ16 Peach · Wing spots work each outline clockwise, starting at the dot on the mapYou need
2 strands · embroidery needle size 7 · 10 cm hoop · SZ12 Rose 1.5 m · SZ06 Soft Black 70 cm · SZ34 Chocolate 70 cm · SZ16 Peach 50 cmWork order
- Four wing shapes (1)
- Body and head (2)
- Antennae (3)
- Wing veins (4)
- Wing spots (5)

The wings are deliberately oversized against a tiny body, with round markings placed like cheeks. It is cute through proportion alone and does not borrow any character design.
Stitch key
1 Stem stitch · SZ12 Rose · Four wing shapes work each outline clockwise, starting at the dot on the map, thread always on the same side 2 Back stitch · SZ06 Soft Black · Body and head work each outline anticlockwise, starting at the dot on the map 3 Stem stitch · SZ06 Soft Black · Antennae work each line up towards the left, one at a time, thread always on the same side 4 Split stitch · SZ34 Chocolate · Wing veins work each outline clockwise, starting at the dot on the map 5 Back stitch · SZ16 Peach · Wing spots work each outline clockwise, starting at the dot on the mapYou need
2 strands · embroidery needle size 7 · 10 cm hoop · SZ12 Rose 1.5 m · SZ06 Soft Black 70 cm · SZ34 Chocolate 30 cm · SZ16 Peach 60 cmWork order
- Four wing shapes (1)
- Body and head (2)
- Antennae (3)
- Wing veins (4)
- Wing spots (5)

Tall forewings and long antennae give the outline the upward pull of a 1900 poster. The internal veins bend with the edge instead of dividing it mechanically.
Stitch key
1 Stem stitch · SZ12 Rose · Four wing shapes work each outline clockwise, starting at the dot on the map, thread always on the same side 2 Back stitch · SZ06 Soft Black · Body and head work each outline anticlockwise, starting at the dot on the map 3 Stem stitch · SZ06 Soft Black · Antennae work each line up towards the left, one at a time, thread always on the same side 4 Split stitch · SZ34 Chocolate · Wing veins work each line left to right, one at a time 5 Back stitch · SZ16 Peach · Wing spots work each line up towards the left, one at a timeYou need
2 strands · embroidery needle size 7 · 10 cm hoop · SZ12 Rose 1.5 m · SZ06 Soft Black 70 cm · SZ34 Chocolate 70 cm · SZ16 Peach 40 cmWork order
- Four wing shapes (1)
- Body and head (2)
- Antennae (3)
- Wing veins (4)
- Wing spots (5)
By the stitch it teaches
Seven designs built around the work rather than renamed after it: an outline-only beginner transfer, four closed wings for satin stitch, broad panels for long and short shading, sixteen marked French knot positions, veins widened for chain stitch, a dusting of seed stitches that thins towards the tips, and an oversized outer edge intended for a laid thread held down by couching.

Every shape remains an outline and every stitch is from the beginner bank. Wings go down in back stitch, antennae in stem stitch and the short veins in split stitch.
Stitch key
1 Back stitch · SZ12 Rose · Four wing shapes work each outline clockwise, starting at the dot on the map 2 Back stitch · SZ06 Soft Black · Body and head work each outline anticlockwise, starting at the dot on the map 3 Stem stitch · SZ06 Soft Black · Antennae work each line bottom to top, one at a time, thread always on the same side 4 Stem stitch · SZ34 Chocolate · Wing veins work each line left to right, one at a time, thread always on the same side 5 Back stitch · SZ16 Peach · Wing spots work each outline clockwise, starting at the dot on the mapYou need
2 strands · embroidery needle size 7 · 10 cm hoop · SZ12 Rose 1.2 m · SZ06 Soft Black 70 cm · SZ34 Chocolate 80 cm · SZ16 Peach 50 cmWork order
- Four wing shapes (1)
- Body and head (2)
- Antennae (3)
- Wing veins (4)
- Wing spots (5)

Four closed wings meet the body without overlapping, and each is narrow enough to fill from edge to edge in controlled satin stitches. Veins are added after the fill.
Stitch key
1 Satin stitch · SZ12 Rose · Four wing shapes fill each shape with parallel strokes laid side to side 2 Back stitch · SZ06 Soft Black · Body and head work each outline anticlockwise, starting at the dot on the map 3 Stem stitch · SZ06 Soft Black · Antennae work each line bottom to top, one at a time, thread always on the same side 4 Split stitch · SZ34 Chocolate · Wing veins work each line left to right, one at a time 5 Back stitch · SZ16 Peach · Wing spots work each outline clockwise, starting at the dot on the mapYou need
2 strands · embroidery needle size 7 · 10 cm hoop · SZ12 Rose 17.5 m · SZ06 Soft Black 80 cm · SZ34 Chocolate 80 cm · SZ16 Peach 60 cmWork order
- Body and head (2)
- Antennae (3)
- Wing veins (4)
- Wing spots (5)
- Four wing shapes (1)

The wing shapes are broad enough for three bands of long and short stitch, darkest beside the body and lightest at the tips. Printed veins preserve the direction of the shading.
Stitch key
1 Long and short stitch · SZ12 Rose · Four wing shapes fill each shape with parallel strokes laid top to bottom 2 Back stitch · SZ06 Soft Black · Body and head work each outline anticlockwise, starting at the dot on the map 3 Stem stitch · SZ06 Soft Black · Antennae work each line up towards the left, one at a time, thread always on the same side 4 Split stitch · SZ34 Chocolate · Wing veins work each line left to right, one at a time 5 Back stitch · SZ16 Peach · Wing spots work each outline clockwise, starting at the dot on the mapYou need
2 strands · embroidery needle size 7 · 10 cm hoop · SZ12 Rose 18.2 m · SZ06 Soft Black 70 cm · SZ34 Chocolate 80 cm · SZ16 Peach 60 cmWork order
- Body and head (2)
- Antennae (3)
- Wing veins (4)
- Wing spots (5)
- Four wing shapes (1)

Sixteen printed knot positions replace ordinary outlined spots, eight on each side. They sit in mirrored rows so the raised texture stays balanced across the body.
Stitch key
1 Stem stitch · SZ12 Rose · Four wing shapes work each outline clockwise, starting at the dot on the map, thread always on the same side 2 Back stitch · SZ06 Soft Black · Body and head work each outline anticlockwise, starting at the dot on the map 3 Stem stitch · SZ06 Soft Black · Antennae work each line bottom to top, one at a time, thread always on the same side 4 Split stitch · SZ34 Chocolate · Wing veins work each line left to right, one at a time 5 French knot · SZ16 Peach · French knot wing spots work the knots last, on the printed spotsYou need
2 strands · embroidery needle size 7 · 10 cm hoop · SZ12 Rose 1.4 m · SZ06 Soft Black 70 cm · SZ34 Chocolate 70 cm · SZ16 Peach 1.0 mWork order
- Four wing shapes (1)
- Body and head (2)
- Antennae (3)
- Wing veins (4)
- French knot wing spots (5)

The veins are spaced for linked chain stitches rather than thin split stitch, giving the wings a strong decorative skeleton. The body stays narrow in back stitch.
Stitch key
1 Chain stitch · SZ12 Rose · Four wing shapes work each outline clockwise, starting at the dot on the map, each loop holding the last 2 Back stitch · SZ06 Soft Black · Body and head work each outline anticlockwise, starting at the dot on the map 3 Stem stitch · SZ06 Soft Black · Antennae work each line up towards the left, one at a time, thread always on the same side 4 Chain stitch · SZ34 Chocolate · Wing veins work each line left to right, one at a time, each loop holding the last 5 Back stitch · SZ16 Peach · Wing spots work each outline clockwise, starting at the dot on the mapYou need
2 strands · embroidery needle size 7 · 10 cm hoop · SZ12 Rose 2.0 m · SZ06 Soft Black 70 cm · SZ34 Chocolate 1.1 m · SZ16 Peach 60 cmWork order
- Four wing shapes (1)
- Body and head (2)
- Antennae (3)
- Wing veins (4)
- Wing spots (5)

A field of small seed stitches starts dense near the thorax and thins towards all four tips. The scatter suggests dusty scales without covering the underlying wing outlines.
Stitch key
1 Stem stitch · SZ12 Rose · Four wing shapes work each outline clockwise, starting at the dot on the map, thread always on the same side 2 Back stitch · SZ06 Soft Black · Body and head work each outline anticlockwise, starting at the dot on the map 3 Stem stitch · SZ06 Soft Black · Antennae work each line up towards the left, one at a time, thread always on the same side 4 Split stitch · SZ34 Chocolate · Wing veins work each line left to right, one at a time 5 Seed stitch · SZ16 Peach · Seed stitch dust across the wings scatter the little stitches at changing anglesYou need
2 strands · embroidery needle size 7 · 10 cm hoop · SZ12 Rose 1.6 m · SZ06 Soft Black 80 cm · SZ34 Chocolate 80 cm · SZ16 Peach 60 cmWork order
- Four wing shapes (1)
- Body and head (2)
- Antennae (3)
- Wing veins (4)
- Seed stitch dust across the wings (5)

The outer edges are broad, uninterrupted curves intended for one laid thread, fixed down at regular intervals. Fine veins and antennae are stitched only after that cord is secure.
Stitch key
1 Couching · SZ12 Rose · Four wing shapes lay the long thread round, then tie it down with tiny crosses 2 Back stitch · SZ06 Soft Black · Body and head work each outline anticlockwise, starting at the dot on the map 3 Stem stitch · SZ06 Soft Black · Antennae work each line bottom to top, one at a time, thread always on the same side 4 Split stitch · SZ34 Chocolate · Wing veins work each line left to right, one at a time 5 Back stitch · SZ16 Peach · Wing spots work each outline clockwise, starting at the dot on the mapYou need
2 strands · embroidery needle size 7 · 10 cm hoop · SZ12 Rose 1.0 m · SZ06 Soft Black 70 cm · SZ34 Chocolate 70 cm · SZ16 Peach 50 cmWork order
- Body and head (2)
- Antennae (3)
- Wing veins (4)
- Wing spots (5)
- Four wing shapes (1)
By finished size and destination
Six pieces measured before they were drawn: a thirty two millimetre pocket butterfly, a true mirrored collar pair, a cuff repeat only twenty six millimetres deep, one butterfly inside a ten centimetre hoop, a three-butterfly composition for a fifteen centimetre hoop and a bold fourteen centimetre panel whose lines remain visible on tote canvas.

Thirty two millimetres is just enough room for four wings, a body and two short antennae without the lines merging. It fits beside a pocket seam and uses one strand.
Stitch key
1 Back stitch · SZ12 Rose · Four wing shapes work each outline clockwise, starting at the dot on the map 2 Back stitch · SZ06 Soft Black · Body and head work each outline anticlockwise, starting at the dot on the map 3 Stem stitch · SZ06 Soft Black · Antennae work each line bottom to top, one at a time, thread always on the same side 4 Stem stitch · SZ34 Chocolate · Wing veins work each line left to right, one at a time, thread always on the same side 5 Back stitch · SZ16 Peach · Wing spots work each outline clockwise, starting at the dot on the mapYou need
1 strand · embroidery needle size 9 · any hoop or frame that clears the drawing · SZ12 Rose 60 cm · SZ06 Soft Black 60 cm · SZ34 Chocolate 50 cm · SZ16 Peach 40 cmWork order
- Four wing shapes (1)
- Body and head (2)
- Antennae (3)
- Wing veins (4)
- Wing spots (5)

A true mirrored pair printed at collar spacing, each butterfly under forty five millimetres wide. Fold the sheet on its centre line to check both placements at once.
Stitch key
1 Stem stitch · SZ12 Rose · Four wing shapes work each outline clockwise, starting at the dot on the map, thread always on the same side 2 Back stitch · SZ06 Soft Black · Body and head work each outline anticlockwise, starting at the dot on the map 3 Stem stitch · SZ06 Soft Black · Antennae work each line up towards the left, one at a time, thread always on the same side 4 Split stitch · SZ34 Chocolate · Wing veins work each line left to right, one at a time 5 Back stitch · SZ16 Peach · Wing spots work each outline clockwise, starting at the dot on the mapYou need
2 strands · embroidery needle size 7 · any hoop or frame that clears the drawing · SZ12 Rose 2.1 m · SZ06 Soft Black 90 cm · SZ34 Chocolate 1.1 m · SZ16 Peach 80 cmWork order
- Four wing shapes (1)
- Body and head (2)
- Antennae (3)
- Wing veins (4)
- Wing spots (5)

The whole repeat is twenty six millimetres deep, with four small butterflies alternating around a straight rail. It can extend along a cuff without gaining height.
Stitch key
1 Back stitch · SZ12 Rose · Four wing shapes work each outline clockwise, starting at the dot on the map 2 Back stitch · SZ06 Soft Black · Body and head work each outline anticlockwise, starting at the dot on the map 3 Stem stitch · SZ06 Soft Black · Antennae work each line up towards the left, one at a time, thread always on the same side 4 Stem stitch · SZ34 Chocolate · Wing veins work each line left to right, one at a time, thread always on the same side 5 Back stitch · SZ16 Peach · Wing spots work each outline clockwise, starting at the dot on the mapYou need
2 strands · embroidery needle size 7 · any hoop or frame that clears the drawing · SZ12 Rose 1.6 m · SZ06 Soft Black 1.0 m · SZ34 Chocolate 1.6 m · SZ16 Peach 70 cmWork order
- Four wing shapes (1)
- Body and head (2)
- Antennae (3)
- Wing veins (4)
- Wing spots (5)

The wing tips stop nine millimetres inside a ten centimetre hoop, leaving fabric for the ring to grip. One open butterfly fills the middle without crowding the edge.
Stitch key
1 Stem stitch · SZ12 Rose · Four wing shapes work each outline clockwise, starting at the dot on the map, thread always on the same side 2 Back stitch · SZ06 Soft Black · Body and head work each outline anticlockwise, starting at the dot on the map 3 Stem stitch · SZ06 Soft Black · Antennae work each line bottom to top, one at a time, thread always on the same side 4 Split stitch · SZ34 Chocolate · Wing veins work each line left to right, one at a time 5 Back stitch · SZ16 Peach · Wing spots work each outline clockwise, starting at the dot on the mapYou need
2 strands · embroidery needle size 7 · 10 cm hoop · SZ12 Rose 1.7 m · SZ06 Soft Black 80 cm · SZ34 Chocolate 80 cm · SZ16 Peach 60 cmWork order
- Four wing shapes (1)
- Body and head (2)
- Antennae (3)
- Wing veins (4)
- Wing spots (5)

Three butterflies at different scales turn through a fifteen centimetre hoop, leaving an open crescent between them. The largest carries full veins and the smallest only an outline.
Stitch key
1 Stem stitch · SZ12 Rose · Four wing shapes work each outline clockwise, starting at the dot on the map, thread always on the same side 2 Back stitch · SZ06 Soft Black · Body and head work each outline anticlockwise, starting at the dot on the map 3 Stem stitch · SZ06 Soft Black · Antennae work each line bottom to top, one at a time, thread always on the same side 4 Split stitch · SZ34 Chocolate · Wing veins work each line left to right, one at a time 5 Back stitch · SZ16 Peach · Wing spots work each outline clockwise, starting at the dot on the mapYou need
2 strands · embroidery needle size 7 · 15 cm hoop · SZ12 Rose 3.3 m · SZ06 Soft Black 1.3 m · SZ34 Chocolate 1.6 m · SZ16 Peach 1.0 mWork order
- Four wing shapes (1)
- Body and head (2)
- Antennae (3)
- Wing veins (4)
- Wing spots (5)

A deliberately broad butterfly with uninterrupted outer curves that remain visible on canvas. The design reaches fourteen centimetres across and avoids every detail smaller than five millimetres.
Stitch key
1 Couching · SZ12 Rose · Four wing shapes lay the long thread round, then tie it down with tiny crosses 2 Back stitch · SZ06 Soft Black · Body and head work each outline anticlockwise, starting at the dot on the map 3 Stem stitch · SZ06 Soft Black · Antennae work each line up towards the left, one at a time, thread always on the same side 4 Split stitch · SZ34 Chocolate · Wing veins work each line left to right, one at a time 5 Back stitch · SZ16 Peach · Wing spots work each outline clockwise, starting at the dot on the mapYou need
2 strands · embroidery needle size 7 · any hoop or frame that clears the drawing · SZ12 Rose 1.9 m · SZ06 Soft Black 1.1 m · SZ34 Chocolate 1.3 m · SZ16 Peach 90 cmWork order
- Body and head (2)
- Antennae (3)
- Wing veins (4)
- Wing spots (5)
- Four wing shapes (1)
How to read one of these transfers
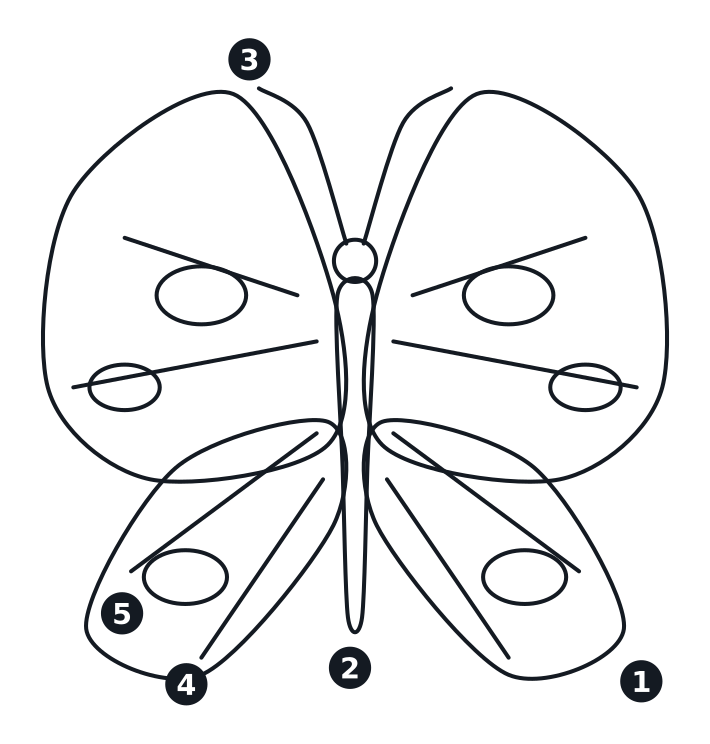
- The drawing is a transfer, not a chart. Print it at 100 per cent and it comes out at the finished size printed on the card.
- Every numbered circle points at one line of the drawing. The stitch key gives that number a stitch, a thread code and a colour.
- A closed shape in the key marked satin stitch is meant to be filled solid. Everything else is worked along the line itself.
- Trace it with a water soluble pen against a window or a lightbox, or tack tissue paper over the fabric and tear it away afterwards.
Stitches on this page
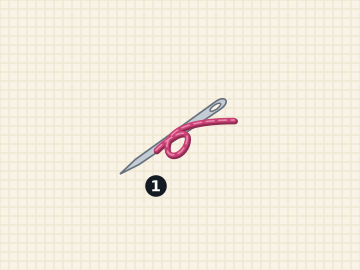
Nine stitches cover every butterfly here, and the two that matter most, stem and back, carry the wing outlines on almost all thirty one. Work the diagrams in order, then take each stitch straight onto the transfer named under it: wings come in mirrored pairs, so every stitch gets practised twice by design.
Back stitch
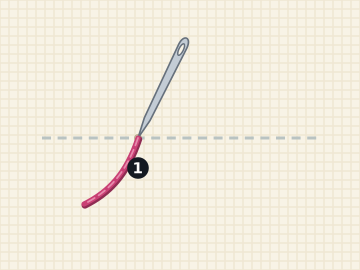
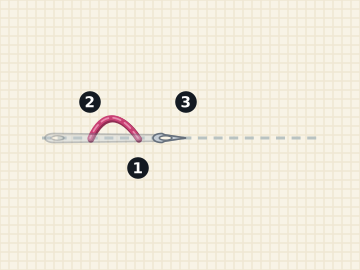
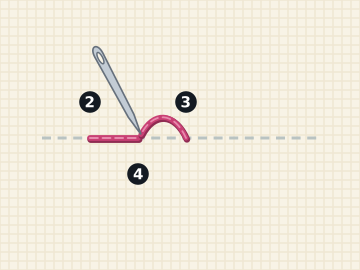
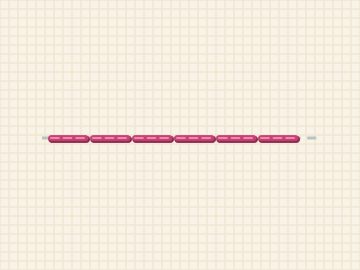
The Beginner Outline Butterfly is back stitch only, and the Tiny Pocket Butterfly finishes in an evening with it.
Stem stitch
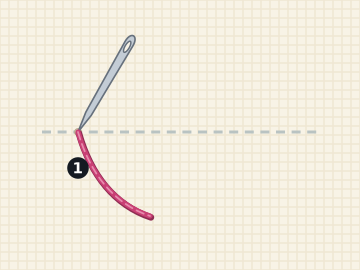
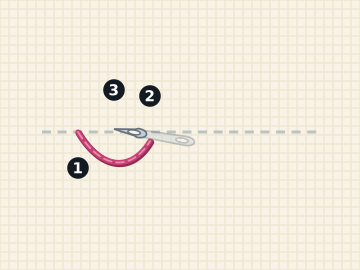
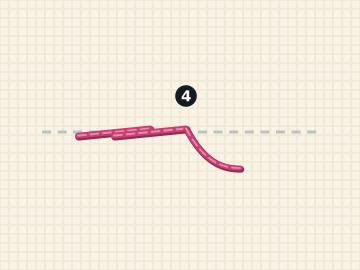
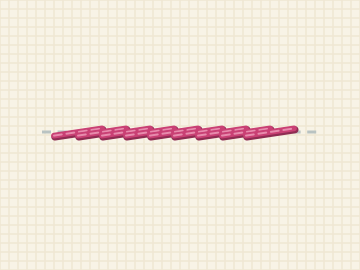
Almost every forewing here, from the Rounded Meadow Butterfly to the Swallowtail, is a stem stitched curve.
Split stitch
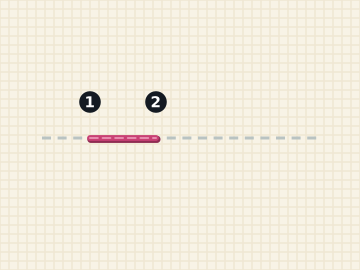
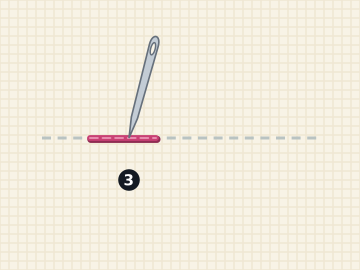
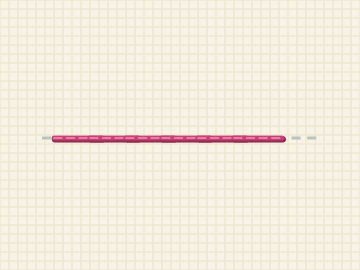
The Botanical Butterfly Study runs its full venation in split stitch, one fine vein at a time.
Chain stitch
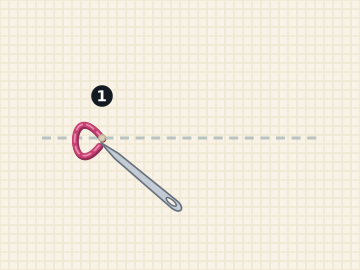
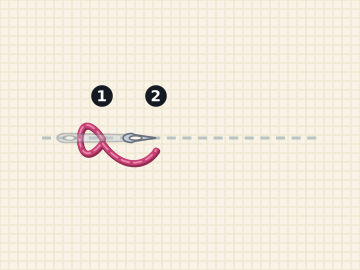
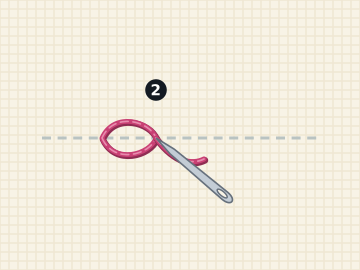
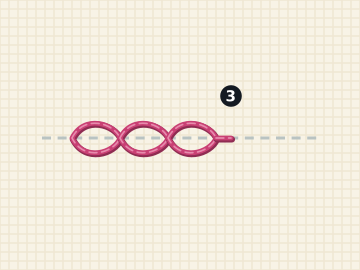
The Chain Stitch Butterfly widens its veins on purpose so every one is a row of these loops.
Satin stitch
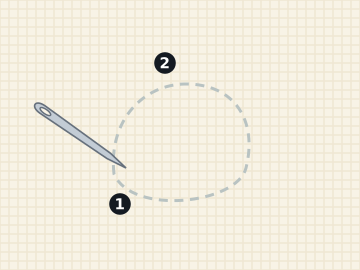
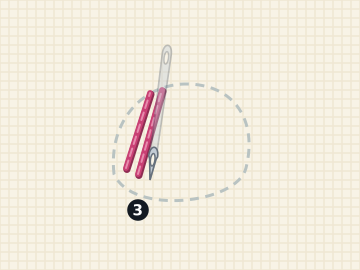
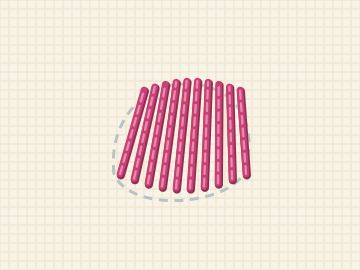
The Satin Stitch Butterfly closes its four wing cells so each one can be filled edge to edge.
Long and short stitch
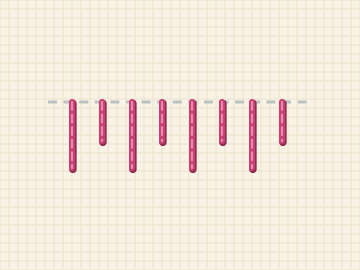
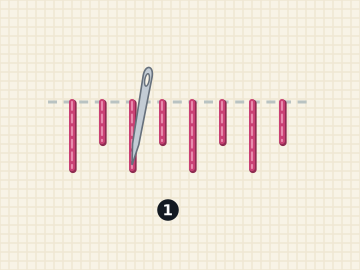
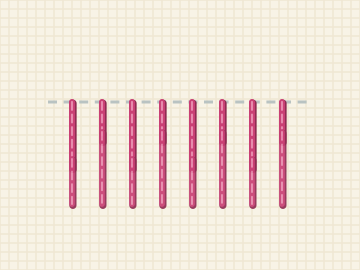
The Shaded Butterfly banks its broad panels for long and short stitch, dark body fading out to the tips.
French knot
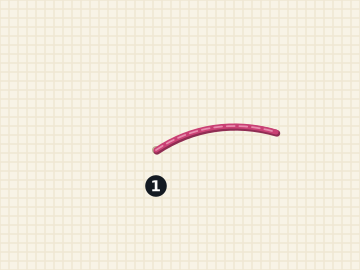
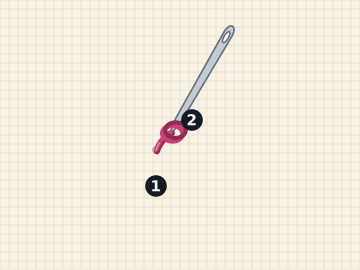
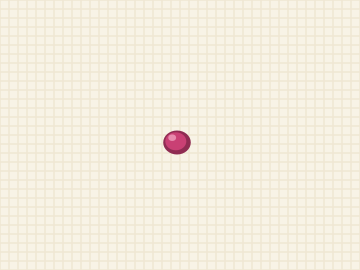
The French Knot Butterfly marks sixteen knot positions on its wings, so the spots come out even.
Seed stitch
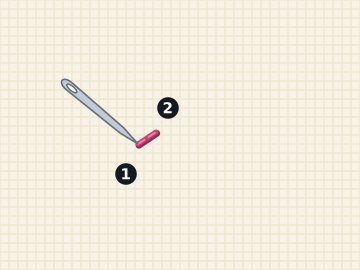
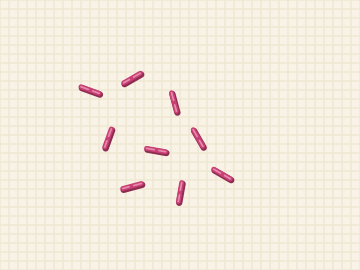
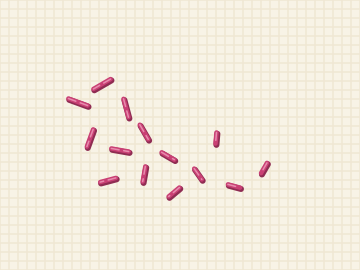
The Seed Stitch Butterfly dusts its wings with seeds that thin towards the tips, like scale dust.
Couching
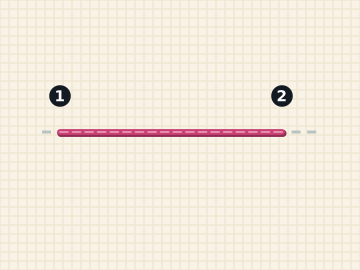
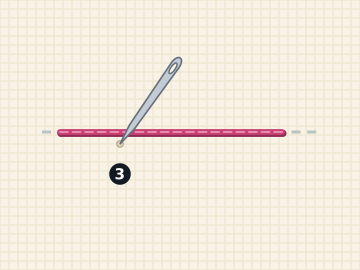
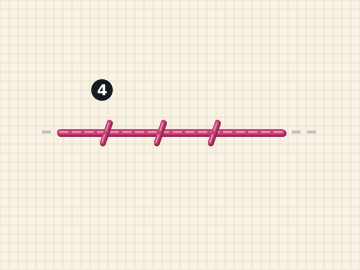
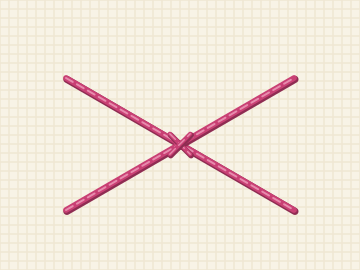
The Couched Butterfly Outline lays one continuous thread round each wing, and the Large Tote Butterfly does the same at twice the size.
What these butterfly patterns are
Every item here is a surface embroidery transfer, not a counted grid. Print the sheet, trace the line drawing onto cloth and follow those lines freehand. A numbered circle connects every part of the drawing to a key that names the stitch, our thread code and a plain colour name. The pattern has no orphan line and the key has no entry that is not present in the art.
The page is deliberately split by decisions a stitcher makes. Wing shape decides what kind of butterfly the outline suggests. Arrangement decides where the piece can sit. Style decides whether the drawing is botanical, geometric, folk or decorative. Technique chooses the skill, and finished size chooses the object. Those are five different questions, each answered by real transfers underneath it.
How the butterfly anatomy stays balanced
A readable butterfly needs four wings attached in the right order. The larger forewings meet the upper thorax and the smaller hindwings meet below them. A narrow segmented body keeps those pairs apart, while antennae leave from the head rather than the wing roots. Every left wing here is a mathematical reflection of its right partner, so the two sides remain level when the transfer is printed at actual size.
Start stitching at the body because it gives both sides a centre line. Work the two forewing outlines as a pair, then the two hindwings, then move inward to the veins. Spots, seed stitches and French knots come last. That order keeps a raised knot from catching under your hand and makes any difference in tension visible while there is still time to correct the matching side.
Tracing and printing at the promised size
Print at 100 per cent and turn off fit to page. Tape the sheet to a bright window, tape the cloth over it and trace with a water soluble pen or a sharp pencil. A tablet showing a white screen works after dark. For thick or dark fabric, tack tissue paper over the cloth, trace onto that, stitch through both layers and tear the paper away when the outline is complete.
The finished measurement on every card comes from the generated geometry and is used to scale the printable sheet. The pocket butterfly really is thirty two millimetres wide, the cuff band stays within its twenty six millimetre depth, and the hoop pages print a dashed hoop circle as a centring guide. A PDF that does not fit on A4 at that real scale is rejected by the builder.
Choosing thread and stitch
Two strands of six-strand cotton suit the standard outlines and one strand keeps the pocket and cuff pieces clear. Satin and long and short stitch need a firm hoop and should move in the direction of the printed veins. French knots use the marked points rather than filling the wing at random. For the couched outline, lay one continuous thread around each wing and fasten it with tiny stitches at even gaps.
Original vector drawings only
Every butterfly on this page was constructed here from authored control points and mirrored geometry. Nothing was traced from a photograph, copied from another transfer or taken from a licensed character. That is why the files can stay free under the plain-language license. The rose embroidery patterns, sunflower embroidery patterns and cat embroidery patterns use the same actual-size sheets, while the cross stitch patterns are the counted-grid side of the site.
How to use these embroidery transfers
- Print the PDF at 100 per cent. The drawing is actual size, so it fits the hoop the pattern names without any scaling.
- Trace the lines onto your fabric, then put it in the hoop drum tight. Two strands of stranded cotton is the default here unless the pattern says otherwise.
- Work the numbers in order: outlines first, filled shapes next, knots last, so nothing already stitched gets flattened under your hand.